Sunday, November 30, 2008
Adding a transition to the timeline
Adding a transition to a project is pretty easy and works the same way in almost every video-editing program available. For now, add a simple dissolve (also called a fade) transition to a project. If your editing program currently shows the storyboard for your project, switch to the timeline. Next, click-and-drag the Dissolve (in Pinnacle Studio) or Cross Dissolve (in iMovie) transition from the list of transitions and drop it between two clips on the timeline. Drop the transition between the first two scenes. The transition will now appear in the timeline between the clips.
The appearance of the transition will vary slightly depending on the editing program you are using. Pinnacle Studio displays the transition as a clip in the Timeline. Apple iMovie, on the other hand, uses a special transition icon that overlaps the adjacent clips, when you first apply a transition in iMovie, the program must render the transition before it can be viewed. Basically it’s a process that allows the computer to play back the transition at full speed and quality.
To preview the transition, simply play the timeline by clicking Play under the preview window or pressing the space bar on your keyboard. If you don’t like the style of the transition, you can delete it by clicking the transition to select it, and then pressing Delete on your keyboard.
Previewing transitions in Pinnacle Studio
Pinnacle Studio comes with 142 (yes, 142) transitions. In fact, so many transitions are provided with Studio that they don’t all fit on one page. To see a list of Studio’s transitions, click the Show Transitions tab on the left side of the album. There are several pages of transitions, and you can view additional pages by clicking the arrows in the upper-right corner of the album.
To preview a transition, simply click it in the album window. A preview of the transition will appear in the viewer window to the right of the album. A blue screen labeled “A” represents the outgoing clip, whereas the incoming clip is represented by the orange “B” clip.
Reviewing iMovie’s transitions
Apple iMovie offers a selection of 13 transitions from which to choose. That may not sound like a big number, but I think you’ll find that iMovie’s 13 transitions cover the styles you’re most likely to use anyway. To view the transitions that are available in iMovie, click the Trans button above the Timeline.
As you look at the list of transitions, most of the names probably look pretty foreign to you. Names like “Circle Closing,” “Radial,” and “Warp Out” are descriptive, but really the only way to know how each transition will look is to preview it. To do so, click the name of a transition in the list. A small preview of the transition briefly appears in the transition preview window. Oops! You missed it. Click the transition’s name again. Wow, it sure flashes by quickly, doesn’t it? If you’d like to see a larger preview, click the Preview button. A full-size preview appears in iMovie’s main viewer screen. If your transition preview window shows nothing but a black screen when you click a transition, move the mouse pointer down and click a clip in the timeline or storyboard to select it. The selected clip should now appear when you preview a transition.
Choosing the best transition
When Windows Movie Maker first came out in 2000, choosing what type of transition to use between clips was easy because you only had two choices. You could either use a straight-cut transition (which is actually no transition at all) or a cross-fade/dissolve transition. If you wanted to use anything fancier, you were out of luck.
Thankfully, most modern video-editing programs — including Windows Movie Maker 2 — provide you with a pretty generous assortment of transitions. Transitions are usually organized in their own window or palette. Transition windows usually vary slightly from program to program, but the basics are the same.
How do you decide which transition is the best? The fancy transitions may look really cool, but I recommend restraint when choosing them. Remember that the focus of your movie project is the actual video content, not showing off your editing skills or the capabilities of your editing software. More often than not, the best transition is a simple dissolve. If you do use a fancier transition, I recommend using the same or a similar transition throughout your project. This will make the transitions seem to fit more seamlessly into the movie.
Friday, November 14, 2008
Using Fades and Transitions Between Clips
One of the trickiest aspects of movie editing (for me, anyway) is making clean transitions between clips. Often the best transition is a simple, straight cut from one clip to the next. Other times, you want to fade gently from one scene to the next. Or you may want a more fancy transition — say, one that makes it look like the outgoing scene is being rolled apart like drapes to reveal the incoming scene behind it. Most transitions can be generally divided into a few basic categories:
- Straight cut: This is actually no transition at all. One clips ends and the next begins, poof! Just like that.
- Fade: The outgoing clip fades out as the incoming clip fades in. Fades are also sometimes called dissolves.
- Wipe: The incoming clip wipes over the outgoing clip using one of many possible patterns. Alternatively, the outgoing clip may wipe away to reveal the incoming clip.
- Push: The outgoing clip is pushed off the screen by the incoming clip.
- 3-D: Some more advanced editing programs provide transitions that seem to work three dimensionally. For example, the outgoing clip might wrap itself up into a 3-D ball, which then spins and rolls off the screen. Pinnacle’s Hollywood FX plug-ins for Studio provide many interesting 3-D transitions. See Appendix D for more on Studio plug-ins.
Modifying light and color in Apple iMovie
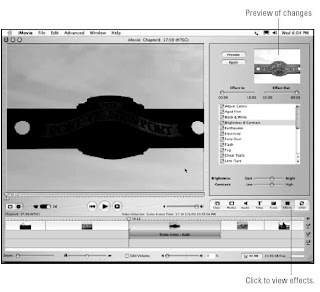
Although Apple iMovie doesn’t have specific image controls (as does, say, Studio), you can still modify color and light characteristics using some of iMovie’s effects. Start by selecting a clip that you want to adjust, and then click the Effects button in the upper-right portion of the timeline. The Effects window appears (as shown in Figure). Then you can use any of several effects to improve the appearance of the clip. Most effects have controls you can adjust by moving sliders. You can also control how the effect starts and finishes. Effects that can modify color and lighting include the following:
- Adjust Colors: Allows you to adjust hue, saturation (color), and lightness.
- Aged Film: If the clip looks really bad, you can avoid blame by applying this effect to make it look like it’s from really old film. (“See, it’s not my fault that the colors are all wrong — this was shot on 8mm film 40 years ago!”) Your secret is safe with me. The Aged Film effect lets you adjust three different factors:
- The Exposure slider lets you make the aged effect appear lighter or darker.
- The Jitter slider controls how much the video image “jitters” up and down. Jitter makes the clip look like film that is not passing smoothly through a projector.
- The Scratches filter lets you adjust how many film “scratches” appear on the video image.
- Black & White: Converts the clip to a black and white image.
- Brightness & Contrast: Adjusts brightness and contrast in the image. (In Figure, I have increased brightness and contrast to improve the appearance of a backlit video clip.) Separate sliders let you control brightness and contrast separately.
- Sepia Tone: Gives the clip an old-fashioned sepia look.
- Sharpen: Sharpens an otherwise blurry image. A slider control lets you fine-tune the level of sharpness that is applied.
- Soft Focus: Gives the image a softer appearance, simulating the effect of a soft light filter on the camera. Three slider controls let you customize the Soft Focus effect:
- The Softness slider controls the level of softness. Move the Softness control towards the Lots end of the slider for a dreamsequence look.
- The Amount slider controls the overall level of the Soft Focus effect.
- The Glow slider increases or decreases the soft glow of the effect. Setting the Glow slider towards High tends to wash out the entire video clip.
Adjusting image qualities in Pinnacle Studio
Pinnacle Studio provides a pretty good selection of image controls. You can use these controls to improve brightness and contrast, adjust colors, or add a stylized appearance to a video image. To access the color controls, doubleclick a clip that you want to improve or modify. When the Clip Properties dialog box appears, click the Adjust Color or Add Visual Effects tab on the left side of the Clip Properties window. The Color Properties window appears as shown in Figure.
At the top of the Color Properties window is the Color Type menu. Here you can choose a basic color mode for the clip. The normal mode is All Colors, but you can also choose Black and White (shown in Figure), Single Hue, or Sepia. Below that menu are eight controls (listed in the order they appear) that you manipulate using sliders:
- Hue: Adjusts the color bias for the clip. Use this if skin tones or other colors in the image don’t look right.
- Saturation: Adjust the intensity of color in the image.
- Brightness: Makes the image brighter or darker.
- Contrast: Adjust the contrast between light and dark parts of the image. If the image appears too dark, use brightness and contrast together to improve the way it looks.
- Blur: Adds a blurry effect to the image.
- Emboss: Simulates a carving or embossed effect. It looks cool, but is of limited use.
- Mosaic: Makes the image look like a bunch of large colored blocks. This is another control you probably won’t use a whole lot.
- Posterize: Reduces the number of different colors in an image. Play with it; you might like it.
Adjusting playback speed in Pinnacle Studio
Pinnacle Studio gives you pretty fine control over playback speed. You can also adjust Strobe if you want to create a stop-motion effect that you may or may not find useful. The only way to really know is to experiment, which you can do by following these steps:
- Switch to the timeline (if you’re not there already) by clicking the timeline view button (refer to Figure).
- Double-click a clip in the timeline to open the Clip Properties window.
- Click the Vary Playback Speed tool on the left side of the Clip Properties window (as in Figure). The Vary Playback Speed controls appear as shown in Figure.
- Move the Speed slider left to slow down the clip, or move it to the right to speed up the clip. An adjustment factor appears above the slider. Normal speed is shown as 1.0 X. Double speed would be 2.0 X, and so on. If you slow the playback speed down, a fraction will appear instead. For example, half speed will be indicated as 5/10 X.
- Move the Strobe slider to add some strobe effect.
- Click Play in the preview window to view your changes.
- If you don’t like your changes and want to revert to the original speed or strobe setting, click one of the Reset buttons.
- Click the Close (X) button in the upper-right corner of the Clip. Properties window when you’re done making changes.
Adjusting playback speed in Apple iMovie
Changing playback speed in iMovie couldn’t be easier. If you look closely, you’ll see a slider adjustment for playback speed right on the timeline. To adjust speed, follow these steps:
- Switch to the timeline (if you aren’t there already) by clicking the timeline view button (refer to Figure).
- Click the clip that you want to adjust to select it. The clip should turn blue when it is selected.
- Adjust the speed slider at the bottom of the timeline, as shown in Figure. To speed up the clip, move the slider toward the hare. Move the slider toward the tortoise to (surprise) slow down the clip.
- Play the clip to preview your changes.
- Giggle at the way the audio sounds after your changes.
Subscribe to:
Posts (Atom)