If you’re using Apple iMovie and you want to make movies in QuickTime format, you’re in luck. QuickTime is the only movie file format that iMovie can produce. QuickTime movies can be played using the QuickTime Player program, which is available for free for Windows and Macintosh systems. If you want to output in a different format, such as RealMedia, you’ll need to use more advanced software such as Final Cut Express. Pinnacle Studio can export movies in RealMedia or Windows Media Video format, but not QuickTime. To create QuickTime movies in Windows, you’ll need QuickTime Pro, or a more advanced editing program such as Adobe Premiere.
Exporting a QuickTime movie from iMovie is pretty simple. The QuickTime format offers a variety of quality and output settings that you can adjust, and iMovie provides several easy-to-use presets. You can also customize export settings if you wish. To export a QuickTime movie:
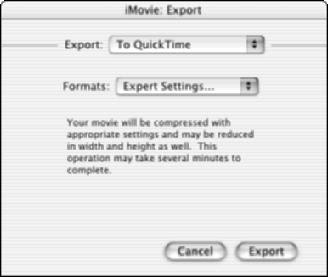
1. When you’re done editing your movie in iMovie, choose File➪Export. The iMovie: Export dialog box appears.
2. Choose To QuickTime from the Export menu.
3. Choose the best preset for the way you plan to distribute your movie from the Formats menu.
iMovie provides three preset formats for export: Email, Web, and Web Streaming. Unless your movie is very short, the CD-ROM and Full Quality DV presets generally produce files that are too big for online use. If you want to fine-tune your own settings, choose Expert Settings from the Formats menu.
4. Click Export. A Save Exported File As dialog box appears.
5. If you chose a preset format, give your movie a filename, choose a folder in which to save it, and click Save to save your movie to a file and finish the export process.
If you chose a preset format in Step 3, you’re done! But if you choose Expert Settings in the Formats menu, you still have a few more steps to complete in the export process. At the bottom of the dialog box, you can choose presets from the Use menu, or click Options. If you click Options, the Movie Settings dialog box appears.
6. (Optional) In the Movie Settings dialog box, leave the check marks next to Video and Sound if you want to include both in your movie.
7. (Optional) In the Movie Settings dialog box, click the Settings button under Video in the Movie Settings dialog box and adjust video settings. The Compression Settings dialog box appears.
Start by choosing a codec from the menu at the top of the dialog box. The Sorenson or H.263 codecs are pretty good for most movies, and the Motion JPEG A codec works well for movies that will be played on older computers. MPEG-4 .
Adjust the Quality slider and preview how your video image will be affected. The Best quality setting provides better picture quality, but also increases the file size.
In the Frames Per Second menu, you can choose a frame rate, or just choose Best from the menu to let iMovie automatically determine a good frame rate. More frames per second increase file size.
I recommend that you leave the Key Frame Every x setting alone. (The default value is 24 — that is, a key frame occurs once every 24 frames — and a smaller number means more key frames.) Key frames help QuickTime compress and decompress the movie. More key frames provide better quality, but they also increase file size. Click OK when you’re done adjusting Compression Settings.
8. (Optional) In the Movie Settings dialog box, click the Filter button.
The Choose Video Filter dialog box appears. Here you can apply filters to your video image that can blur, sharpen, recolor, brighten, or perform a variety of other changes to the picture. Most filters also have adjustments that you can make using slider controls. A preview of your video image appears in the Choose Video Filter dialog box so that you can see the affects of the various filters. I don’t usually find these filters very useful because normally I’ve already applied filters or effects to my video during the editing process. After making your selections, click OK to close the Choose Video Filter dialog box.
9. (Optional) In the Movie Settings dialog box, click the Size button.
The Export Size Settings dialog box appears. Choose either Use Current Size, or choose Use Custom Size and enter a custom width and height in pixels. Click OK to close the Export Size Settings dialog box.
10. (Optional) In the Movie Settings dialog box, click the Settings button under Sound.
For online movies, choose QDesign Music 2 in the Compressor menu. Reduce the sampling rate using the Rate box (for online use I recommend 22.050 kHz or lower). Switching from Stereo to Mono will also reduce the file size. Click OK to close the Sound Settings dialog box.
11. (Optional) In the Movie Settings dialog box, leave the Prepare for Internet Streaming option checked if you want to take advantage of streaming or progressive download for this movie, and choose the Fast Start option in the Streaming menu.
12. Click OK to close the Movie Settings dialog box, and then click Save in the Save Exported File As dialog box.
The movie will be exported using the settings you provided. When the export process is complete, preview your movie in QuickTime, and check the file size of the movie. If the movie file is too big, re-export it using the lower quality settings (such as a smaller frame size, lower frame rate, or lower sample rate for the audio). If the movie is smaller than you expected, you may want to re-export it using slightly higher quality settings. When you’re done, you can share your QuickTime movie file online by attaching it to an e-mail or placing it on a Web site.

No comments:
Post a Comment