Modifying the overall volume for an audio clip or a whole track is pretty simple, but the procedure varies a bit depending on which program you are using.
In Apple iMovie, follow these steps:
- Click a clip to select it. (To adjust multiple clips simultaneously, hold down the Ô key as you click each clip.) Be careful not to click the purple rubberband line. If you accidentally click the rubberband and a dot appears on the line, press Ô+Z to undo the change.
- With the desired clip(s) selected, adjust the Volume slider leftward to reduce volume or right to increase volume.
As you adjust the slider , you see the rubberband lines move up or down.
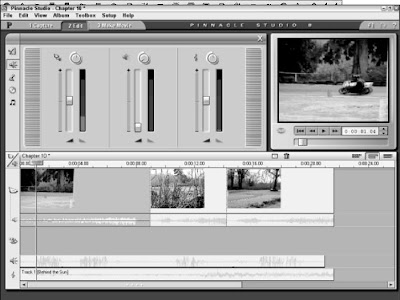
Pinnacle Studio provides a variety of volume controls in the audio toolbox, as you can see in Figure. To open this toolbox, click an audio clip in the timeline and choose Toolbox➪Change Volume. The toolbox contains a separate set of controls for each of the three audio tracks:
- Left: Main audio track
- Middle: Sound effects/narration track
- Right: Background music track
To adjust the overall volume for an entire track, turn the knob at the top of the track’s volume controls. As you turn the knob, you see the blue audio rubberband line for the entire track move up or down in the timeline. If you want to adjust the volume for a specific clip, place the play head at the very beginning of that clip in the timeline and move the volume slider for that track up or down. Then place the play head at the end of the clip, and adjust the volume slider back to the middle to restore the volume of subsequent clips in the timeline.
You can also mute whole tracks in the timeline if you want. In iMovie, simply remove the check mark from the right side of the timeline next to the track you want to mute. In Studio, click the icon at the top of the volume controls in the audio toolbox to mute a given track.

 To view a list of sound effects in iMovie, click the Audio button above themtimeline and choose iMovie Sound Effects from the menu at the top of thenaudio pane. A list of soundneffects appears (as shown in Figure), includingbstandard sound effects as well as special Skywalker Sound Effects that were new with iMovie 3. Skywalker Sound, as you may know, is the brainchild of George Lucas of Star Wars fame, and the sound effects included with iMovie are very high-quality. To preview a sound effect, choose it from the list and click Play in the audio


 A movie program can play several sources of audio at once. For example, while you hear the audio that was recorded with a video clip, you may also hear a musical soundtrack and some narration that was recorded later. When you’re working on a movie project in your editing software, each of these unique bits of audio would go on its own separate audio track in the timeline. Most editing programs provide audio tracks for main audio (the audio that was recorded with a video clip), music, and narration. More advanced editing programs offer you many more audio tracks that you can use any way you see fit. Adobe Premiere, for example, can provide up to 99 separate audio tracks in the timeline. Although it’s difficult to imagine anyone actually needing that many audio tracks, having too many is better than not having enough. Pinnacle Studio provides three separate audio tracks. To lock a track in Studio, click the track header on the left side of the timeline.