Saturday, July 31, 2010

Finding an online home for your movies (Youtube Alternatives)


If you want other people to be able to download and watch your movies, you’ll need to put the movie files on a Web server. Your Internet service provider (ISP) might actually provide some free Web server space with your Internet account. This free space is usually limited to about 5 to 15MB, but the exact amount varies greatly. You can use your Web server space to publish pictures, movies, and Web pages that anyone on the Internet can see. Check with your ISP to find out whether you have some available Web server space — and, if you do, get instructions for uploading your files to their Web server.
If your ISP doesn’t provide Web server space, or if it isn’t enough space to hold all of your movie files, don’t worry. Plenty of other resources are available. Several companies specialize in selling server space that you can use to store your movies. These are Youtube alternatives:
  • .Mac (www.mac.com): This service from Apple includes e-mail tools, an address book, antivirus service, and most importantly, 100 MB of storage space on their Web server. Uploading movie files to .Mac is just as easy as copying files to different disks on your computer. The .Mac service costs approximately $100 per year, and provides many more features than I can list here.
  • HugeHost.com (www.hugehost.com): As the name implies, HugeHost.com lets you put huge files online. The service is quite affordable, as well. For example, 1000MB (yes, one thousand) is just $5 per month, or $55 per year. See their Web site for other pricing plans.
  • Neptune Mediashare (www.neptune.com): This service is partnered with Microsoft so you can easily access the Neptune Web site directly from within Windows Movie Maker. When you export a movie for the Web from Movie Maker, you are given the opportunity to log on to your Neptune Mediashare account and upload files instantly. The Mediashare Pro service provides 100MB of storage space for $39 per year. Whatever you use as a Web server for your movie files, make sure you get specific instructions for uploading. You’ll also need to know what the Web address is for the files that you upload. You can then send that address to other people so that they can find and download your movie.

Using the Windows Media format


Although Microsoft was late to the online multimedia game, Windows Media is quickly becoming one of the most popular video formats on the Web. Pinnacle Studio can export directly to Windows Media format. To do so, choose View ➪ Make Movie, and then choose Stream on the left side of the Make Movie window. Click the Windows Media radio button that appears. I strongly recommend that you review export settings before making a Windows Media file, and you can review those settings by clicking the (surprise!) Settings button in the Make Movie window. The Make Windows Media tab of the Pinnacle Studio Setup Options dialog box appears.
When you adjust settings for Windows Media export, check the following:
  • Title: Enter a plain English title for your movie here. This title will appear at the bottom of the Windows Media Player window when your movie is played.
  • Author: They can’t give out awards if they don’t know who made the movie! Enter your name here to give yourself proper credit.
  • Copyright: Enter a year, and month and day if you like.
  • Description: Type a brief description of your movie. This description will scroll across the bottom of the Windows Media Player window as the movie plays.
  • Rating: Give your movie a rating if you want.
  • Markers: If you include Markers in your Windows Media movie, viewers can jump from clip to clip by pressing the Next and Previous buttons in their Windows Media Player programs. manually named while you were editing your project will have markers.
  • Playback Quality: Choose the Low, Medium, or High presets in the menu on the left. If you choose Custom, a second menu appears to the right, displaying a wider selection of presets. A summary of movie settings for each preset is shown under the Playback Quality menus.

Monday, May 31, 2010

Using the RealVideo format


RealVideo is a popular format for online videos, and making RealVideo movies in Pinnacle Studio is pretty easy. In the Make Movie window, click Stream, and then select the RealVideo radio button. Next, click Settings. The Make RealVideo tab of the Pinnacle Studio Setup Options dialog box appears.
Review the following settings, adjusting them as needed:
  • Title: Enter a title for your movie. This title will appear in the program window when people view your movie, so it should be written in plain English.
  • Author: That’s you! Enter your name here.
  • Copyright: Enter the year. You can enter the month and day if you wish, but it’s not necessary.
  • Keywords: Enter some keywords relating to your movie. This will help people who are searching for your movie using the keywords you list.
  • Video Quality: Choose a video quality option here. Most of the time, the safest choice in this menu is Normal Motion Video. The Smoothest Motion Video option works well with video that doesn’t have a lot of action, whereas the Sharpest Image Video option is best for video that does have a lot of action. The Slide Show option shows a series of still images, which obviously isn’t ideal for most video. If you choose the No Video option, no video will be included in the file.
  • Audio Quality: Choose an option from this menu that matches the majority of audio in your project. Choices include No Audio, Voice Only, Voice with Background Music, Music, and Stereo Music.
  • Video Size: Select a frame size for your video image here.
  • Web Server: If you know that your movie will be placed on a RealServer streaming media server, choose the RealServer option. Otherwise, choose HTTP.
  • Target Audience: If your movie will be placed on a RealServer, you can choose multiple options here. The server will automatically detect the connection speed of each person who accesses your movie, and a movie of the appropriate quality level will be sent. If you are placing your movie on a regular Web server (HTTP), you can only choose one option. Movie quality settings will be automatically tailored to the Target audience that you choose.
If you’re placing your movie on a regular Web server (HTTP), you may want to output two different versions of the same movie for people with different connection speeds. Output a lower-quality movie using the Dial-up Modem setting, and then output a higher-quality version of the same movie using one of the DSL/Cable settings. Give each file a unique name and provide separate descriptive links to each one on your Web page.

E-mailing your movies

The World Wide Web seems to get all the attention these days, but I think that e-mail, more than anything else, revolutionized the way we communicated during the last decade. Most of your friends, relatives, and business associates probably have e-mail addresses, and you probably exchange e-mail messages with those folks on a regular basis.
E-mail is already a great way to quickly share stories and pictures with others, and now that you’re making your own movies, it only seems natural to start e-mailing your movie projects to friends as well. Before you do, keep in mind that movie files tend to be really big. Most e-mail accounts have file-size limitations for e-mail attachments, sometimes as low as 2MB. Other e-mail accounts don’t allow any file attachments at all. And of course, many people still have slow dial-up modem connections to the Internet, meaning it will take them a long time to download a movie you send them. If you want to e-mail a movie to someone, first ask the person whether it’s okay to do so. Send an initial e-mail that says something like, “Hi there! I just finished a really awesome movie and I want to send it to you. The movie is in QuickTime format and the file is 1.3 MB. Can I e-mail it to you?” Most people will probably say yes, and they’ll appreciate that you took the time to ask.

Making QuickTime movies with iMovie


If you’re using Apple iMovie and you want to make movies in QuickTime format, you’re in luck. QuickTime is the only movie file format that iMovie can produce. QuickTime movies can be played using the QuickTime Player program, which is available for free for Windows and Macintosh systems. If you want to output in a different format, such as RealMedia, you’ll need to use more advanced software such as Final Cut Express. Pinnacle Studio can export movies in RealMedia or Windows Media Video format, but not QuickTime. To create QuickTime movies in Windows, you’ll need QuickTime Pro, or a more advanced editing program such as Adobe Premiere.
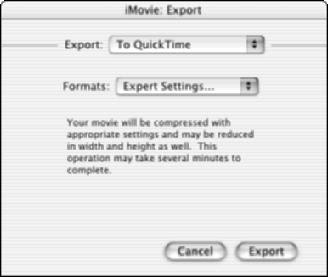
Exporting a QuickTime movie from iMovie is pretty simple. The QuickTime format offers a variety of quality and output settings that you can adjust, and iMovie provides several easy-to-use presets. You can also customize export settings if you wish. To export a QuickTime movie:
1. When you’re done editing your movie in iMovie, choose File➪Export. The iMovie: Export dialog box appears.

2. Choose To QuickTime from the Export menu.

3. Choose the best preset for the way you plan to distribute your movie from the Formats menu.
iMovie provides three preset formats for export: Email, Web, and Web Streaming. Unless your movie is very short, the CD-ROM and Full Quality DV presets generally produce files that are too big for online use. If you want to fine-tune your own settings, choose Expert Settings from the Formats menu.

4. Click Export. A Save Exported File As dialog box appears.

5. If you chose a preset format, give your movie a filename, choose a folder in which to save it, and click Save to save your movie to a file and finish the export process.
If you chose a preset format in Step 3, you’re done! But if you choose Expert Settings in the Formats menu, you still have a few more steps to complete in the export process. At the bottom of the dialog box, you can choose presets from the Use menu, or click Options. If you click Options, the Movie Settings dialog box appears.

6. (Optional) In the Movie Settings dialog box, leave the check marks next to Video and Sound if you want to include both in your movie.

7. (Optional) In the Movie Settings dialog box, click the Settings button under Video in the Movie Settings dialog box and adjust video settings. The Compression Settings dialog box appears.
Start by choosing a codec from the menu at the top of the dialog box. The Sorenson or H.263 codecs are pretty good for most movies, and the Motion JPEG A codec works well for movies that will be played on older computers. MPEG-4 .
Adjust the Quality slider and preview how your video image will be affected. The Best quality setting provides better picture quality, but also increases the file size.
In the Frames Per Second menu, you can choose a frame rate, or just choose Best from the menu to let iMovie automatically determine a good frame rate. More frames per second increase file size.
I recommend that you leave the Key Frame Every x setting alone. (The default value is 24 — that is, a key frame occurs once every 24 frames — and a smaller number means more key frames.) Key frames help QuickTime compress and decompress the movie. More key frames provide better quality, but they also increase file size. Click OK when you’re done adjusting Compression Settings.

8. (Optional) In the Movie Settings dialog box, click the Filter button.
The Choose Video Filter dialog box appears. Here you can apply filters to your video image that can blur, sharpen, recolor, brighten, or perform a variety of other changes to the picture. Most filters also have adjustments that you can make using slider controls. A preview of your video image appears in the Choose Video Filter dialog box so that you can see the affects of the various filters. I don’t usually find these filters very useful because normally I’ve already applied filters or effects to my video during the editing process. After making your selections, click OK to close the Choose Video Filter dialog box.

9. (Optional) In the Movie Settings dialog box, click the Size button.
The Export Size Settings dialog box appears. Choose either Use Current Size, or choose Use Custom Size and enter a custom width and height in pixels. Click OK to close the Export Size Settings dialog box.

10. (Optional) In the Movie Settings dialog box, click the Settings button under Sound.
For online movies, choose QDesign Music 2 in the Compressor menu. Reduce the sampling rate using the Rate box (for online use I recommend 22.050 kHz or lower). Switching from Stereo to Mono will also reduce the file size. Click OK to close the Sound Settings dialog box.

11. (Optional) In the Movie Settings dialog box, leave the Prepare for Internet Streaming option checked if you want to take advantage of streaming or progressive download for this movie, and choose the Fast Start option in the Streaming menu.

12. Click OK to close the Movie Settings dialog box, and then click Save in the Save Exported File As dialog box.

The movie will be exported using the settings you provided. When the export process is complete, preview your movie in QuickTime, and check the file size of the movie. If the movie file is too big, re-export it using the lower quality settings (such as a smaller frame size, lower frame rate, or lower sample rate for the audio). If the movie is smaller than you expected, you may want to re-export it using slightly higher quality settings. When you’re done, you can share your QuickTime movie file online by attaching it to an e-mail or placing it on a Web site.

Friday, April 30, 2010

A Short Review on Windows Media Player


Microsoft’s Windows Media Player (version 7 or newer) can play many common media formats. I like to abbreviate the program’s name WMP because, well, it’s easier to type than Windows Media Player. WMP comes pre-installed on computers that run Windows Me or Windows XP. Although the name says “Windows,” versions of WMP are also available for Macintosh computers that run OS 8 or higher.
Windows Media Player can play video in MPEG and AVI formats. Although Pinnacle Studio can output both of these formats, they’re not terribly useful for online applications because they create big files and have an appetite for resources. Windows Media Player can also play Windows Media Video (WMV) format, and Studio can output that as well (by using the Streaming option in the Make Movie window, I’ll show you how later in this chapter). I like the WMV format because it provides decent quality (for Web movies) with remarkably small file sizes.
What are the compelling reasons for choosing over other players? Choose Windows Media Player as your format if
  • Most or all of your audience members use Windows. Most Windows users already have WMP installed on their systems, so they won’t have to download or install new software before viewing your Windows Media-format movie.
  • You want the look, but not the expense and complexity, of streaming media. If you don’t want to deal with the hassle of setting up and maintaining a streaming-media server, Windows Media format files can provide a workable compromise. WMP does a decent simulation of streaming media with progressive downloadable video: When downloading files, WMP begins playing the movie as soon as enough of it is downloaded to ensure uninterrupted playback.
  • You’re distributing your movie online and extremely small file size is more important than quality. The Windows Media format can offer some very small file sizes, which is good if your audience will be downloading your movie over slow dial-up Internet connections. I recently placed a 3:23-long movie online in Windows Media format and the file size was only 5.5MB (megabytes). Of course, the movie was not broadcast quality, but because most of my friends and family still have slow dial-up modem connections to the Internet, they appreciated the relatively small download size.

A Short Review on RealPlayer


Another very popular media player is RealPlayer from RealNetworks.
RealPlayer is available for Macintosh, Windows, and even Unix-based systems. The free RealPlayer software is most often used for RealMedia streaming media over the Internet, though it can also play MPEG-format media as well. Pinnacle Studio allows you to export movies in the RealMedia format using the “Streaming” option in the Make Movie window. Although RealNetworks does offer a free version of the RealPlayer , you have to look at their Web site carefully for the “Free RealOne Player” link before you can download it. RealNetworks offers other programs as well — and though they’re not free, they offer additional features. RealNetworks has specialized in the delivery of streaming content, and they offer a variety of delivery options. You can use their software to run your own RealMedia streaming server, or you can outsource such “broadcast” duties to RealNetworks.
A complaint often heard about RealPlayer is that the software tends to be intrusive and resource-hungry once installed — and that the program itself collects information about your media-usage habits and sends that information to RealNetworks. Although RealPlayer is extremely popular, consider that some folks out there simply refuse to install RealNetworks software on their computers. RealMedia is an excellent format, but I recommend that you offer your audience a choice of formats if you plan to use it; include (for example) QuickTime or Windows Media Video.