Sunday, October 31, 2010

Exporting to tape in Apple iMovie


Like most software from Apple, iMovie is entirely functional and to-the-point. And at no time is this more evident than when you want to export your movie to tape. iMovie doesn’t have the ability to export directly to an analog capture card, but it definitely can export video at full quality to your digital camcorder.
To export your finished movie to tape, follow these steps:

1. Connect your digital camcorder to the FireWire port on your computer, and turn the camera on to VTR or Player mode.
Make sure that you have a new, blank videotape cued up and ready in the camcorder.

2. In iMovie, choose File➪Export.

3. Choose To Camera from the Export menu.

4. Adjust the Wait field if you want.
The Wait field controls how long iMovie waits for the camera to get ready before it begins export. I recommend leaving the Wait field set at five seconds unless you’re exporting to a video converter (such as the Dazzle Hollywood DV Bridge) connected to your FireWire port. In that case, you may want to increase the wait to about ten seconds or so to ensure that you have enough time to press the Record button manually on your VCR.
Whatever you do, don’t reduce the Wait field to less than five seconds. Virtually all camcorders need some time to bring their tape-drive mechanisms up to the proper speed, and the Wait gives the camcorder time to get ready.

5. Adjust the two Add fields to determine the amount of black video that will be recorded at the beginning and end of the tape.
I recommend putting at least 30 seconds of black video at the beginning and end of the movie.

6. Click Export.
iMovie will automatically export your movie to the tape in your camcorder. If you’re exporting directly to a digital camcorder, iMovie will automatically control the camera for you; there’s no need to press the Record button on the camcorder. But if you are exporting through a video converter, you’ll need to manually press Record on your analog VCR.

Exporting Movie

After your hardware is set up properly and you’re sure that your movie will look good on a regular TV, you’re ready to export the movie. Regardless of what software you are using, keep in mind that — like video capture — video export uses a lot of memory and computer resources. To make sure that your system is ready for export:
  • Turn off unnecessary programs. If you’re like me, you probably feel like you can’t live without your e-mail program, Internet messaging program, Web browser, and music jukebox all running at once. Maybe you can’t live without these things, but your video-editing software will get along just fine without them. In fact, the export process will work much better if these things are closed, and you’re less likely to have dropped frames or other quality problems during export.
  • Disable power-management settings. If you’re exporting a movie that’s 30 minutes long, and your hard disk is set to go into power-saving mode after 15 minutes, you could have a problem during export because the computer will mistakenly decide that exporting a movie is the same thing as inactivity. Power management is usually a good thing, but if your hard disk or other system components go into sleep mode during export, the video export will fail. Pay special attention to this if you’re working on a laptop, which probably has pretty aggressive powermanagement settings right now.
  • On a Mac, use the Energy Saver icon in System Preferences to adjust power settings. Crank all the sliders in the Energy Saver window up to Never before you export your movie.
  • • In Windows, open the Control Panel, click the Performance and Maintenance category if you see it, and then open the Power Options icon. Set all of the pull-down menus to Never before exporting your movie.
  • Disable screen savers. Screen savers aren’t quite as likely to ruin a movie export as power-management settings, but it’s better to be safe than sorry.
  1. In Windows, right-click a blank area of the Windows desktop and choose Properties. Click the Screen Saver tab of the Display Properties dialog box, and choose the None screen saver. (That’s my favorite one, personally.)
  2. On your Mac, open the Screen Saver icon in System Preferences and choose Never on the Activation tab of the Screen Saver dialog box.

Whenever you export a movie to tape, I always recommend that you place some black video at the beginning and end of the movie. Black video at the beginning of the tape gives your audience some time to sit down and relax between the time they push Play and the movie actually starts. Black video at the end of the movie also gives your viewers some time to press Stop before that loud, bright static comes on and puts out someone’s eye. Some editing programs — like Apple iMovie — have tools that allow you to automatically insert black video during the export process. I’ll show you how to insert black video using iMovie in the next section. But if you’re using some other software that doesn’t have this feature — like Pinnacle Studio or Windows Movie Maker — you’ll need to add a clip of black video to the beginning and end of the project’s timeline. You can usually do this by creating a blank full-screen title, and I’ll show you how later in this chapter. The most common failures encountered on VHS tapes are mangling or breakage at the very beginning of the tapes. Employees at video rental stores are quite skilled in the art of VHS tape repair, and they often repair beginning-oftape problems by cutting off the damaged tape, and then re-attaching the remaining good tape to the reel. If you put 30 seconds of black video at the beginning of your VHS tapes, about three feet of tape can be cut off before any of your movie is trimmed away. And if you ever need such a repair performed, head down to your local video store. You should be able to find someone there who will do the job for a couple of dollars.

Setting Up Your Hardware


Getting your hardware ready for exporting a movie to tape isn’t so difficult, really. The easiest thing to do is connect your digital camcorder to your FireWire port and turn on your camcorder to VTR or Player mode. (Oh yeah, and insert a blank tape into the camcorder.) After your movie is recorded onto the tape in your camcorder, you can connect the camcorder to a regular VCR and dub your movie onto a regular VHS tape if you want. I strongly urge you to use a fresh tape that has black video recorded on its entire length. This will prevent errors in communication between your digital camcorder and your computer.
If your master plan is to eventually record your movie on a VHS tape, you may want to skip the middleman — that would be your digital camcorder —and record straight from your computer to a regular VCR. To do so, you have three basic options:
  • Use an analog video-capture card. Analog capture cards (such as the Pinnacle AV/DV board) can usually export to an analog source as well as import from one. When you export video using an analog card, I strongly recommend you use the software that came with that card. Most analog capture cards come with special utilities to help you import and export video. The Pinnacle AV/DV board uses Pinnacle Studio to capture and export video. To get Studio ready for analog export, follow these steps
  1. Connect the analog outputs for the card to the video inputs on your VCR.
  2. Make sure the software that came with the capture card is set to export to the correct ports. The Pinnacle AV/DV, for example, uses the Pinnacle Studio software. In Studio, choose Setup ➪ Make Tape. The Pinnacle Studio Setup Options dialog box appears. On the Make Tape tab, choose Studio AV/DV analog in the Video dropdown list.
  3. Make sure that the right analog output ports are selected. The Pinnacle AV/DV board has both composite and S-Video outputs, so choose the one to which you have connected your VCR.
  • Use a video converter.
  • Use your digital camcorder as a converter.
I know, I know, I said I was going to show you how to avoid using your camcorder as the middleman when you export to VHS tape. But if you don’t have an analog-capture card or a video converter, you might be able to connect your digital camcorder to your FireWire port, and then connect a VCR to the camcorder’s analog outputs. If nothing else, this arrangement reduces wear and tear on your camcorder’s expensive tape-drive mechanism. Some digital camcorders won’t allow you to make this connection, because some models can’t send video out the analog ports at the same time they’re taking video in through the FireWire cable. Experiment with your own camcorder and VCR and see whether this arrangement will work for you. If you are exporting to a VCR, make sure that a new, blank tape is inserted and ready to use, and make sure the VCR is set to the right channel. (Many VCRs have to be set to a special “AV” channel to accept video from composite video cables.) As a last step before you begin your export, preview your movie on a TV connected to the VCR to make sure that the VCR is picking up the signal.

Thursday, September 30, 2010

Prepping Your Movie for TV Playback


This means that the video that looks just peachy in the preview window of your editing software may not look all that great when it’s viewed on a regular TV. Computer monitors and TVs differ in three important ways:
  • Color: Computer monitors and television screens generate colors differently. This means that colors that look fine on your computer may not look so hot when viewed on a TV.
  • Pixel shape: Video images are made up of a grid of tiny little blocks called pixels. Pixels on computer monitors are square, but the pixels in TV images are slightly rectangular. This usually isn’t a problem for video captured from your camcorder, but still images and graphics generated on your computer could be a problem.
  • Interlacing: TV video images are usually interlaced, whereas computer monitors draw images by using progressive scanning. The main problems you encounter when you export a project to tape is that the very thin lines that show up on the screen may flicker or appear to crawl. Pay special attention to titles, where thin lines are likely to appear in some letters.

If you use the LCD display on your camcorder to preview your movie, keep in mind that the LCD panel probably isn’t interlaced. However, the camcorder’s viewfinder probably is interlaced. This means that flickering thin lines (for example) may show up in the viewfinder but not on the LCD panel. Preview the movie using both the LCD display and the viewfinder before you actually export it.

Saturday, July 31, 2010

Finding an online home for your movies (Youtube Alternatives)


If you want other people to be able to download and watch your movies, you’ll need to put the movie files on a Web server. Your Internet service provider (ISP) might actually provide some free Web server space with your Internet account. This free space is usually limited to about 5 to 15MB, but the exact amount varies greatly. You can use your Web server space to publish pictures, movies, and Web pages that anyone on the Internet can see. Check with your ISP to find out whether you have some available Web server space — and, if you do, get instructions for uploading your files to their Web server.
If your ISP doesn’t provide Web server space, or if it isn’t enough space to hold all of your movie files, don’t worry. Plenty of other resources are available. Several companies specialize in selling server space that you can use to store your movies. These are Youtube alternatives:
  • .Mac (www.mac.com): This service from Apple includes e-mail tools, an address book, antivirus service, and most importantly, 100 MB of storage space on their Web server. Uploading movie files to .Mac is just as easy as copying files to different disks on your computer. The .Mac service costs approximately $100 per year, and provides many more features than I can list here.
  • HugeHost.com (www.hugehost.com): As the name implies, HugeHost.com lets you put huge files online. The service is quite affordable, as well. For example, 1000MB (yes, one thousand) is just $5 per month, or $55 per year. See their Web site for other pricing plans.
  • Neptune Mediashare (www.neptune.com): This service is partnered with Microsoft so you can easily access the Neptune Web site directly from within Windows Movie Maker. When you export a movie for the Web from Movie Maker, you are given the opportunity to log on to your Neptune Mediashare account and upload files instantly. The Mediashare Pro service provides 100MB of storage space for $39 per year. Whatever you use as a Web server for your movie files, make sure you get specific instructions for uploading. You’ll also need to know what the Web address is for the files that you upload. You can then send that address to other people so that they can find and download your movie.

Using the Windows Media format


Although Microsoft was late to the online multimedia game, Windows Media is quickly becoming one of the most popular video formats on the Web. Pinnacle Studio can export directly to Windows Media format. To do so, choose View ➪ Make Movie, and then choose Stream on the left side of the Make Movie window. Click the Windows Media radio button that appears. I strongly recommend that you review export settings before making a Windows Media file, and you can review those settings by clicking the (surprise!) Settings button in the Make Movie window. The Make Windows Media tab of the Pinnacle Studio Setup Options dialog box appears.
When you adjust settings for Windows Media export, check the following:
  • Title: Enter a plain English title for your movie here. This title will appear at the bottom of the Windows Media Player window when your movie is played.
  • Author: They can’t give out awards if they don’t know who made the movie! Enter your name here to give yourself proper credit.
  • Copyright: Enter a year, and month and day if you like.
  • Description: Type a brief description of your movie. This description will scroll across the bottom of the Windows Media Player window as the movie plays.
  • Rating: Give your movie a rating if you want.
  • Markers: If you include Markers in your Windows Media movie, viewers can jump from clip to clip by pressing the Next and Previous buttons in their Windows Media Player programs. manually named while you were editing your project will have markers.
  • Playback Quality: Choose the Low, Medium, or High presets in the menu on the left. If you choose Custom, a second menu appears to the right, displaying a wider selection of presets. A summary of movie settings for each preset is shown under the Playback Quality menus.

Monday, May 31, 2010

Using the RealVideo format


RealVideo is a popular format for online videos, and making RealVideo movies in Pinnacle Studio is pretty easy. In the Make Movie window, click Stream, and then select the RealVideo radio button. Next, click Settings. The Make RealVideo tab of the Pinnacle Studio Setup Options dialog box appears.
Review the following settings, adjusting them as needed:
  • Title: Enter a title for your movie. This title will appear in the program window when people view your movie, so it should be written in plain English.
  • Author: That’s you! Enter your name here.
  • Copyright: Enter the year. You can enter the month and day if you wish, but it’s not necessary.
  • Keywords: Enter some keywords relating to your movie. This will help people who are searching for your movie using the keywords you list.
  • Video Quality: Choose a video quality option here. Most of the time, the safest choice in this menu is Normal Motion Video. The Smoothest Motion Video option works well with video that doesn’t have a lot of action, whereas the Sharpest Image Video option is best for video that does have a lot of action. The Slide Show option shows a series of still images, which obviously isn’t ideal for most video. If you choose the No Video option, no video will be included in the file.
  • Audio Quality: Choose an option from this menu that matches the majority of audio in your project. Choices include No Audio, Voice Only, Voice with Background Music, Music, and Stereo Music.
  • Video Size: Select a frame size for your video image here.
  • Web Server: If you know that your movie will be placed on a RealServer streaming media server, choose the RealServer option. Otherwise, choose HTTP.
  • Target Audience: If your movie will be placed on a RealServer, you can choose multiple options here. The server will automatically detect the connection speed of each person who accesses your movie, and a movie of the appropriate quality level will be sent. If you are placing your movie on a regular Web server (HTTP), you can only choose one option. Movie quality settings will be automatically tailored to the Target audience that you choose.
If you’re placing your movie on a regular Web server (HTTP), you may want to output two different versions of the same movie for people with different connection speeds. Output a lower-quality movie using the Dial-up Modem setting, and then output a higher-quality version of the same movie using one of the DSL/Cable settings. Give each file a unique name and provide separate descriptive links to each one on your Web page.

E-mailing your movies

The World Wide Web seems to get all the attention these days, but I think that e-mail, more than anything else, revolutionized the way we communicated during the last decade. Most of your friends, relatives, and business associates probably have e-mail addresses, and you probably exchange e-mail messages with those folks on a regular basis.
E-mail is already a great way to quickly share stories and pictures with others, and now that you’re making your own movies, it only seems natural to start e-mailing your movie projects to friends as well. Before you do, keep in mind that movie files tend to be really big. Most e-mail accounts have file-size limitations for e-mail attachments, sometimes as low as 2MB. Other e-mail accounts don’t allow any file attachments at all. And of course, many people still have slow dial-up modem connections to the Internet, meaning it will take them a long time to download a movie you send them. If you want to e-mail a movie to someone, first ask the person whether it’s okay to do so. Send an initial e-mail that says something like, “Hi there! I just finished a really awesome movie and I want to send it to you. The movie is in QuickTime format and the file is 1.3 MB. Can I e-mail it to you?” Most people will probably say yes, and they’ll appreciate that you took the time to ask.

Making QuickTime movies with iMovie


If you’re using Apple iMovie and you want to make movies in QuickTime format, you’re in luck. QuickTime is the only movie file format that iMovie can produce. QuickTime movies can be played using the QuickTime Player program, which is available for free for Windows and Macintosh systems. If you want to output in a different format, such as RealMedia, you’ll need to use more advanced software such as Final Cut Express. Pinnacle Studio can export movies in RealMedia or Windows Media Video format, but not QuickTime. To create QuickTime movies in Windows, you’ll need QuickTime Pro, or a more advanced editing program such as Adobe Premiere.
Exporting a QuickTime movie from iMovie is pretty simple. The QuickTime format offers a variety of quality and output settings that you can adjust, and iMovie provides several easy-to-use presets. You can also customize export settings if you wish. To export a QuickTime movie:
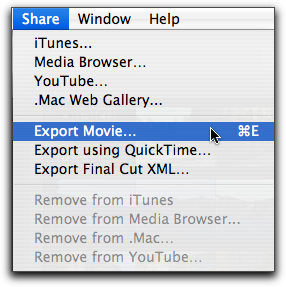
1. When you’re done editing your movie in iMovie, choose File➪Export. The iMovie: Export dialog box appears.

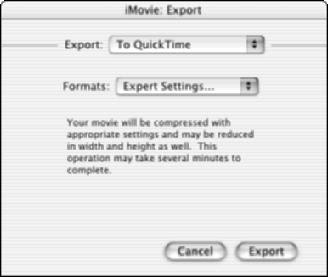
2. Choose To QuickTime from the Export menu.

3. Choose the best preset for the way you plan to distribute your movie from the Formats menu.
iMovie provides three preset formats for export: Email, Web, and Web Streaming. Unless your movie is very short, the CD-ROM and Full Quality DV presets generally produce files that are too big for online use. If you want to fine-tune your own settings, choose Expert Settings from the Formats menu.

4. Click Export. A Save Exported File As dialog box appears.

5. If you chose a preset format, give your movie a filename, choose a folder in which to save it, and click Save to save your movie to a file and finish the export process.
If you chose a preset format in Step 3, you’re done! But if you choose Expert Settings in the Formats menu, you still have a few more steps to complete in the export process. At the bottom of the dialog box, you can choose presets from the Use menu, or click Options. If you click Options, the Movie Settings dialog box appears.

6. (Optional) In the Movie Settings dialog box, leave the check marks next to Video and Sound if you want to include both in your movie.

7. (Optional) In the Movie Settings dialog box, click the Settings button under Video in the Movie Settings dialog box and adjust video settings. The Compression Settings dialog box appears.
Start by choosing a codec from the menu at the top of the dialog box. The Sorenson or H.263 codecs are pretty good for most movies, and the Motion JPEG A codec works well for movies that will be played on older computers. MPEG-4 .
Adjust the Quality slider and preview how your video image will be affected. The Best quality setting provides better picture quality, but also increases the file size.
In the Frames Per Second menu, you can choose a frame rate, or just choose Best from the menu to let iMovie automatically determine a good frame rate. More frames per second increase file size.
I recommend that you leave the Key Frame Every x setting alone. (The default value is 24 — that is, a key frame occurs once every 24 frames — and a smaller number means more key frames.) Key frames help QuickTime compress and decompress the movie. More key frames provide better quality, but they also increase file size. Click OK when you’re done adjusting Compression Settings.

8. (Optional) In the Movie Settings dialog box, click the Filter button.
The Choose Video Filter dialog box appears. Here you can apply filters to your video image that can blur, sharpen, recolor, brighten, or perform a variety of other changes to the picture. Most filters also have adjustments that you can make using slider controls. A preview of your video image appears in the Choose Video Filter dialog box so that you can see the affects of the various filters. I don’t usually find these filters very useful because normally I’ve already applied filters or effects to my video during the editing process. After making your selections, click OK to close the Choose Video Filter dialog box.

9. (Optional) In the Movie Settings dialog box, click the Size button.
The Export Size Settings dialog box appears. Choose either Use Current Size, or choose Use Custom Size and enter a custom width and height in pixels. Click OK to close the Export Size Settings dialog box.

10. (Optional) In the Movie Settings dialog box, click the Settings button under Sound.
For online movies, choose QDesign Music 2 in the Compressor menu. Reduce the sampling rate using the Rate box (for online use I recommend 22.050 kHz or lower). Switching from Stereo to Mono will also reduce the file size. Click OK to close the Sound Settings dialog box.

11. (Optional) In the Movie Settings dialog box, leave the Prepare for Internet Streaming option checked if you want to take advantage of streaming or progressive download for this movie, and choose the Fast Start option in the Streaming menu.

12. Click OK to close the Movie Settings dialog box, and then click Save in the Save Exported File As dialog box.

The movie will be exported using the settings you provided. When the export process is complete, preview your movie in QuickTime, and check the file size of the movie. If the movie file is too big, re-export it using the lower quality settings (such as a smaller frame size, lower frame rate, or lower sample rate for the audio). If the movie is smaller than you expected, you may want to re-export it using slightly higher quality settings. When you’re done, you can share your QuickTime movie file online by attaching it to an e-mail or placing it on a Web site.

Friday, April 30, 2010

A Short Review on Windows Media Player


Microsoft’s Windows Media Player (version 7 or newer) can play many common media formats. I like to abbreviate the program’s name WMP because, well, it’s easier to type than Windows Media Player. WMP comes pre-installed on computers that run Windows Me or Windows XP. Although the name says “Windows,” versions of WMP are also available for Macintosh computers that run OS 8 or higher.
Windows Media Player can play video in MPEG and AVI formats. Although Pinnacle Studio can output both of these formats, they’re not terribly useful for online applications because they create big files and have an appetite for resources. Windows Media Player can also play Windows Media Video (WMV) format, and Studio can output that as well (by using the Streaming option in the Make Movie window, I’ll show you how later in this chapter). I like the WMV format because it provides decent quality (for Web movies) with remarkably small file sizes.
What are the compelling reasons for choosing over other players? Choose Windows Media Player as your format if
  • Most or all of your audience members use Windows. Most Windows users already have WMP installed on their systems, so they won’t have to download or install new software before viewing your Windows Media-format movie.
  • You want the look, but not the expense and complexity, of streaming media. If you don’t want to deal with the hassle of setting up and maintaining a streaming-media server, Windows Media format files can provide a workable compromise. WMP does a decent simulation of streaming media with progressive downloadable video: When downloading files, WMP begins playing the movie as soon as enough of it is downloaded to ensure uninterrupted playback.
  • You’re distributing your movie online and extremely small file size is more important than quality. The Windows Media format can offer some very small file sizes, which is good if your audience will be downloading your movie over slow dial-up Internet connections. I recently placed a 3:23-long movie online in Windows Media format and the file size was only 5.5MB (megabytes). Of course, the movie was not broadcast quality, but because most of my friends and family still have slow dial-up modem connections to the Internet, they appreciated the relatively small download size.

A Short Review on RealPlayer


Another very popular media player is RealPlayer from RealNetworks.
RealPlayer is available for Macintosh, Windows, and even Unix-based systems. The free RealPlayer software is most often used for RealMedia streaming media over the Internet, though it can also play MPEG-format media as well. Pinnacle Studio allows you to export movies in the RealMedia format using the “Streaming” option in the Make Movie window. Although RealNetworks does offer a free version of the RealPlayer , you have to look at their Web site carefully for the “Free RealOne Player” link before you can download it. RealNetworks offers other programs as well — and though they’re not free, they offer additional features. RealNetworks has specialized in the delivery of streaming content, and they offer a variety of delivery options. You can use their software to run your own RealMedia streaming server, or you can outsource such “broadcast” duties to RealNetworks.
A complaint often heard about RealPlayer is that the software tends to be intrusive and resource-hungry once installed — and that the program itself collects information about your media-usage habits and sends that information to RealNetworks. Although RealPlayer is extremely popular, consider that some folks out there simply refuse to install RealNetworks software on their computers. RealMedia is an excellent format, but I recommend that you offer your audience a choice of formats if you plan to use it; include (for example) QuickTime or Windows Media Video.

A Short Review on QuickTime


Apple QuickTime is perhaps the most ubiquitous media player in the personal computer world today, which makes it a good overall choice for your audience. QuickTime is available for Macintosh and Windows systems and is included with Mac OS 9 and higher. QuickTime can play MPEG and QuickTime media. The QuickTime Player also supports progressive download, where files begin playing as soon as enough has been downloaded to allow continuous playback.
Apple also offers an upgraded version of QuickTime called QuickTime Pro.
QuickTime Pro costs about $30 (the regular QuickTime Player is free). Key
features of QuickTime Pro include
  • Full-screen playback
  • Additional media management features
  • Simple audio and video creation and export tools
  • Advanced import/export options If you already have iMovie (and therefore regular QuickTime), you don’t absolutely need the extra features of QuickTime Pro.
Your audience really doesn’t need QuickTime Pro either (unless of course they want to watch movies in full screen). The standard QuickTime Player should suffice in most cases. Apple iMovie exports QuickTime-format files. If you’re a Windows user, QuickTime Pro allows you to convert MPEG files to QuickTime format. Some advanced Windows editing programs (such as Adobe Premiere) can also export files in QuickTime format.

Wednesday, March 31, 2010

Streaming your video


Doing stuff on the Internet usually means downloading files. For example, when you visit a Web page, files containing all the text and pictures on that Web page are first downloaded to your computer, and then your Web-browser program opens them. Likewise, if someone e-mails you a picture or a document with yucky work stuff, your e-mail program actually downloads a file before you open it.
Downloading files takes time, especially if they’re big video files. You sit there and you wait. And wait. And wait. Finally the movie file is done downloading and starts to play, but by then you’ve left the room for a cup of coffee again. But software designers are crafty folk, and they’ve devised methods of getting around the problem of waiting a long time for downloads. They’ve come up with two basic solutions:
  • Streaming media: Rather than downloading a file to your hard drive, streaming files can be played as the data streams through your modem. It works kind of like a radio, where “data” streams through in the form of radio waves, and that data is immediately played through the radio’s speakers as it is received. With streaming audio or video, no file is ever saved on your hard drive. To truly stream your movies to other people, your movie files need to be on a special streaming server on the Web. There is a remote possibility that your Internet service provider offers a streaming media server, but most service providers do not.
  • Progressive download: Newer video-player programs can “fake” streaming pretty effectively. Rather than receiving a movie signal broadcast over the Internet like a radio wave, viewers simply click a link to open the movie as if they were downloading the file. In fact, they are downloading the file — but as soon as enough of the file has been received, the player program can start to play. The program doesn’t need to wait for the whole file to download before it starts. Current versions of QuickTime, RealPlayer, and Windows Media Player all support progressive download. The really cool thing about progressive download is that you don’t need any special kind of server to host the files. Just upload the video file to any server that has enough room to fit it in.
I’m actually being kind of picky about terminology here. Many people now refer to progressive download video files as “streaming video,” and because they basically function the same way, why not? The good news is that you don’t need to do anything special to stream (or progressively download, or whatever you want to call it) your movies to your audience. Just output your movie in QuickTime, RealVideo, or Windows Media Video format, and let the player programs do the rest.

Choosing a Video Format for Internet


Many different video formats are available for the movies you edit on your computer. Each format uses a different codec. (I explain codecs in greater detail in Chapter 13, but a codec, short for compressor/decompressor, is a software tool used for making multimedia files smaller.) Common video file formats include MPEG and AVI, but these two formats are usually not suitable for movies you plan to share online because they have big file sizes. Three other popular formats, however, are perfectly suited to the online world:
  • QuickTime (.QT): Many Windows users and virtually all Macintosh users have the QuickTime Player program from Apple. QuickTime is the only export format available with iMovie. Pinnacle Studio cannot export QuickTime movies, but some more advanced Windows programs like Adobe Premiere can.
  • RealMedia (.RM): This is the format used by the popular RealPlayer, available for Windows and Macintosh systems, among others. Pinnacle Studio can export RealMedia-format video.
  • Windows Movie Video: This format requires Windows Media Player. Almost all Windows users and some Macintosh users already have it. Both Pinnacle Studio and Windows Movie Maker can export Windows Media Video.
Each of these three video formats has strengths and weaknesses. Ultimately the format you choose will probably depend mainly on the editing software you’re using — for example, if you’re using iMovie on a Mac, QuickTime is your only option.

Setting MPEG settings


I like the MPEG format because it is easy to use and — most importantly —widely supported among Mac and PC users. MPEG is actually a family of multimedia file standards. There are currently four MPEG standards:
  • MPEG-1: This is the oldest version of the standard. A drawback of MPEG-1 is that it has a maximum picture size of 352 by 240 pixels.
  • MPEG-2: This standard offers much higher video quality and full-size video. In fact, MPEG-2 is the format used by DVD movies, so if you burn your movies onto DVD, this is the format you’ll use. MPEG-2 files require special MPEG-2 player software, such as a DVD player program.
  • MPEG-3: Usually abbreviated MP3, this file format only contains audio and is a popular file format for music files today.
  • MPEG-4: This newer standard is a cross of MPEG video and Apple QuickTime to produce video with very, very small file sizes. Support for this format is still limited. Studio’s MPEG settings dialog box is a lot simpler than the AVI settings. Review the following settings as you get ready to export your movie in MPEG format:
  • Presets: Studio provides a selection of presets based on how the file will be used. For example, if you plan to record the movie on a VCD, choose the VideoCD preset from the Presets menu.
If possible, I recommend that you stick with one of the presets, but if you absolutely must fiddle with the rest of the MPEG settings, choose Custom from the Presets menu. If you use one of the presets, you can simply click OK to close the Setup Options dialog box. Additional settings can only be adjusted if you choose Custom.
  • Include video: You’ll want to leave this option checked unless you only want to generate an audio file.
  • Filter video: If you’re working with a smaller frame size, check this option to smooth the appearance of the video image.
  • Draft mode: Check this option if you just want to quickly produce a low-quality file for previewing purposes.
  • Compression: Choose MPEG1 or MPEG2. Again, MPEG-2 can provide higher quality, but it requires special player software. MPEG-2 is used on movie DVDs.
  • Width and height: Select a frame size for your video image here. Smaller frame sizes mean smaller files.
  • Data rate: Most of the time you can leave these sliders alone, but you can use them to fine-tune the quality and file size.
The slider on the left controls video data rate, and the slider on the right controls audio data rate. The Make MPEG File tab of the Setup Options dialog box also includes a couple of audio settings. Audio options are
  • Include audio: Uncheck this option if you only want to output video.
  • Sample rate: 44.1 kHz is CD quality, but most digital camcorders can record at 48 kHz. The higher the sample rate, the higher the audio quality (and file size).
  • Data Rate: Use this slider to fine-tune the quality of the audio. Slide it left to reduce quality and file size, or slide it right to increase quality and file size. As you adjust the slider, you see the number in the Kbits/sec box change. Generally I recommend leaving the Data Rate slider alone unless you really need to squeeze a couple more kilobytes of file size out of your movie file.

Sunday, February 28, 2010

Decoding codecs


Digital video contains a lot of data. If you were to copy uncompressed digital video onto your hard disk, it would consume 20 MB (megabytes) for every second of video. Simple arithmetic tells us that one minute of uncompressed video would use over 1GB. Even with a 60GB hard drive, you would have room for only about 50 minutes of uncompressed video, assuming that big drive was empty to begin with. Dire though this may seem, storage isn’t even the biggest problem with uncompressed video. Typical hard drive busses and other components in your computer simply can’t handle a transfer rate of 20MB per second, meaning that some video frames will be dropped from the video.
To deal with the massive bandwidth requirements of video, digital video is compressed using compression schemes called codecs (compressor/decompressor). The DV codec, which is used by most digital camcorders, compresses video down to 3.6MB per second. This data rate is far more manageable than uncompressed video, and most modern computer hardware can handle it without trouble. When you capture DV video from a camcorder using a FireWire interface, a minute of video consumes just over 200MB of hard disk space. Again, most modern computers can manage that. Why do codecs matter to you? When you choose a file format for exporting your movie, you’re also usually choosing a codec to compress your movie (whether you realize it or not). Usually your export software automatically chooses a codec for you, but as you’ve seen in this chapter, you can also usually choose a specific codec if you wish. Some codecs compress video more than others. Generally speaking, the more video is compressed, the more quality you lose. In most cases I recommend you use the default codec chosen by Studio (or whatever program you are using) when you select an export format.

Choosing AVI Settings in Pinnacle Studio

The AVI format was developed several eons ago by Microsoft as the file format of Video for Windows video files. AVI files can use one of several codecs to compress video. Codecs control exactly how the audio and video is compressed. As you can see in Figure, Studio’s Setup Options dialog box makes it pretty easy to choose a codec or modify other settings.
The video settings include
  • Include Video in AVI File: I’m guessing you’ll want to leave this option checked for 99.9975% of all your projects. If you uncheck this option, only audio will be included in the file.
  • List All Codecs: I recommend you leave this option unchecked. Many multimedia programs install codecs on your computer, and if you check the “List all codecs” option, each and every codec installed on your PC will appear in the list, even ones that aren’t compatible with Studio.
  • Options: Some codecs have further options you can adjust. I generally recommend that you don’t mess with these options.
  • Compression: This menu allows you to choose a codec. Many multimedia programs install codecs on your computer, so the list of codecs may vary depending on what is installed on your computer. The Cinepak codec (which comes with Studio) is pretty good for all around use, and is particularly recommended for movies that will be recorded onto a CD.
  • Width and Height: These indicate the size of your video image in pixels. Full-size DV-format video is 720 by 480 pixels. Reducing the size of the picture can greatly reduce the file size, but make sure you keep the ratio between the height and width the same, or your video image may look distorted.
  • Frames/Second: This controls the frame rate of the video file. Full-quality DV-format video uses a frame rate of 29.97 frames per second (fps). Reducing the frame rate decreases playback quality, but it also greatly reduces file size.
  • Quality or Data Rate: This slider control isn’t available with all codecs, but when it is available, it allows you to adjust the quality up or down to control file size. A smaller data rate greatly reduces file size.

Exporting Your Movie to an AVI or MPEG with Pinnacle Studio

If you’re using Apple iMovie, QuickTime is the only file format available for export. If you’re using Pinnacle Studio, you have more options. To export your movie to an AVI or MPEG file:
  1. In Studio, choose View➪Make Movie. The Make Movie screen appears.
  2. Click either AVI or MPEG on the left side of the Make Movie window. Choose the format to which you want to export. Generally speaking, AVI (Audio Video Interleave) files are a little bigger than MPEG (Moving Picture Experts Group) files. Anyone with a semi-modern Windows PC should be able to view either format. Another benefit of choosing MPEG is that Macs can usually open them, whereas AVI files are usually not Mac-compatible.
  3. Click the Settings button. The Pinnacle Studio Setup Options dialog box appears, as shown in Figure. If you chose AVI in Step 2, the Make AVI File tab will be in front. If you chose MPEG in Step 2, the Make MPEG File tab will be in front.
  4. Adjust settings and click OK. I’ll describe the various AVI and MPEG export settings in the following two sections.
  5. Review the estimated file size above the Settings button in the Make Movie window. The estimated file size is just that — an estimate. It’s usually pretty close to what the final file size will be, but seldom exact. If the file seems too big, adjust settings so that the video picture is smaller or the audio quality is lower.
  6. Click Create AVI File or Create MPEG file to create your movie.
  7. In the dialog box that appears, choose a folder in which to save your movie, and give it a filename.
  8. Click OK.
The export process will probably take a few seconds or even minutes, depending on the length of your movie and the number of effects. One reason you might want to export a movie as an AVI or MPEG file is if you plan to edit it using other software. For example, if I want to export a movie for the Web in Windows Media Video (WMV) format, I prefer to use the export feature in Windows Movie Maker. When I’m done editing in Studio, I export the movie in AVI format, which can be easily imported into Movie Maker. After the AVI file is imported into Windows Movie Maker, I use that program to export a WMV file.
AVI is a good format to use if you want to export video for many Windowsbased video-editing programs, including Windows Movie Maker or Adobe Premiere for Windows, but you may find that some editing programs prefer MPEG. Pinnacle’s Hollywood FX Pro, for example, works better with MPEGformat video. And of course, if you plan to use the exported file on a Mac, you’ll find that the MPEG format will be much more compatible with Mac multimedia software.
If you aren’t sure whether you have a specific need for one format or the other, it probably doesn’t matter very much which one you choose. AVI files are usually a little bigger than MPEG files, but as I said earlier, if you’re concerned about file sizes — say, for example, you plan to share the movie on the Internet — you really ought to be exporting the movie in a Web-friendly format like RealVideo or Windows Media.

Sunday, January 31, 2010

Exporting a Movie


After about the millionth preview, you’ll probably come to the realization that your movie will never be perfect: If you don’t just give up and release your movie, it will never be seen by anyone. Star Wars creator George Lucas once described this process as one of abandonment because most moviemakers almost never feel that a project is truly finished. When you decide that it’s time to “abandon” your project, you must export the movie so that others can view it. Before you export your movie, you must decide in which format you wish to export. After you’ve edited your movie in a program like Studio or iMovie, you aren’t limited to showing your work to others on your computer. You have many options with which to share your movie:
  • Videotape: Almost everyone you know probably has a VCR that plays VHS tapes. Sure, the quality and gee-whiz factor of VHS tapes isn’t as high as DVD, but most of your audience really won’t care. If you have an analog capture card such as a Pinnacle AV/DV board, you can connect a VCR directly to your computer and export your movie directly to a VHS tape. Otherwise export the movie back to a tape in your digital camcorder, and then dub the movie from the camcorder tape to a VCR
  • DVD: The DVD (Digital Versatile Disc) player is quickly supplanting the VCR as the home video player of choice for many people. Tens of millions of households already have DVD players in their home entertainment systems, and many modern computers can play DVD movies as well. DVD recorders are now relatively affordable, so making your own DVDs is pretty easy..
  • VCD/S-VCD: If you don’t have a DVD burner yet, you can make DVD-like movie discs called VCDs (Video Compact Discs) or S-VCDs (Super VCDs) using a regular CD-R drive and blank CDs. VCDs can hold about one hour of video, and S-VCDs hold 20 minutes of higher quality video. VCDs and S-VCDs can be played in most DVD players.
  • Internet: The Internet is a popular place to share video, but remember that video files are usually very big and most people still have relatively slow Internet connections. If you plan to export your movie for use on the Internet, use a Web-friendly format such as Apple QuickTime, RealNetworks RealVideo, or Windows Media Video. These formats usually have fairly low quality, but the trade-off is much smaller file sizes. When choosing one of these formats, make sure that your intended audience has software that can play your movies.
  • Video file: Some programs allow you to simply save the movie as a file. Common video file formats include AVI and MPEG. These files can be stored on your computer, or burned onto a CD so that others can watch your movie on their computers as well. Just remember that the AVI and MPEG formats are generally too big for anyone but broadband users to access online. AVI or MPEG files are useful, however, if you plan to edit the movie further using another editing program.

Previewing on an external monitor

Your editing software has a preview window, and at first glance it probably seems to work well enough. But if you plan to record your movie on videotape or DVD, just previewing it on the computer screen can cause a couple of problems:
  • TVs usually provide a bigger view. A larger TV screen reveals camera movements and other flaws that might not be obvious in the tiny preview window on your computer screen.
  • Computer monitors and TVs show color differently. Colors that look right on your computer may not look the same on a TV.
  • Most TVs are interlaced. TVs are usually interlaced, whereas computer monitors are progressively scanned, or non-interlaced. Titles or other graphics that have very thin lines may look fine on your computer monitor, but when viewed on a TV, those thin lines may flicker or appear to shimmer or crawl.
The cheapest option is to connect your digital camcorder to your FireWire port, and then connect the TV to the analog output on your camcorder. If you have an analog capture card in your computer, such as the Pinnacle AV/DV board, you can connect your TV (and VCR) to the analog outputs for the card.
Apple iMovie makes previewing your work on an external TV monitor very easy. In iMovie, choose iMovie ➪ Preferences. The iMovie Preferences dialog box appears as shown in Figure. Place a check mark next to Play Video Through to Camera under Advanced options. Now that this option is enabled, whenever you play the timeline, the video will be sent out to your camcorder if it is connected to your FireWire port and turned on in Player or VTR mode. If you have a TV monitor hooked up to the camcorder’s analog outputs, the video image should appear there as well.
Pinnacle Studio also allows you to preview video on an external monitor, although it’s a little more complicated. Basically, you have to export the movie as if you were done and ready to record it on tape. After the movie is exported for tape, you can play the export file and preview it on an external monitor as many times as you like without actually recording the tape.

Casting a critical eye on your project


Of course, there’s more to previewing your project than simply clicking Play. Consider carefully what you are actually previewing when you play your movie. Here are some ways to get the most out of previewing your project:
  • Watch the whole program from start to finish. You may be tempted to periodically stop playback, reverse, and repeat sections, or perhaps even make tweaks to the project as you run it. This is fine, but to get a Click to play a movie fullscreen. really good “feeling” for the flow of the movie, watch the whole thing start to finish — just as your audience will. Keep a notepad handy and jot down quick notes if you must.
  • Watch the program on an external TV. If you plan to record your movie on videotape or DVD, previewing on an external monitor is very helpful. (See the next section in this chapter for a more detailed explanation.)
  • Have trusted third parties review the project. Moviemakers and writers are often too close to their creations to be totally objective; an “outside” point of view can help a lot. Although I worked hard to write this book (for example), my work was reviewed by various editors and their feedback was invaluable. Movie projects benefit from a similar review process. Even if you want to maintain strict creative control over your project, feedback from people who were not involved with creating it can help you see it afresh.