Monday, November 30, 2009

Previewing Your Movie

I could start and end this section by simply saying “Click Play” under the preview window in your editing program. If you want to see a bigger preview in Apple iMovie, click the Play Movie Fullscreen button. If you are using Pinnacle Studio, alas, you are limited to the tiny, inflexible size of the Studio preview window.
Of course, truly previewing a movie means a whole lot more than just clicking the Play button. To perform a truly effective preview, you must
  • Draw a properly critical eye on the movie.
  • Decide whether just previewing the movie on your computer screen is sufficient, or whether you need to preview it on a TV monitor. The next two sections address both of these subjects.
Warm up that coffee, sit back in your director’s chair, and get ready to see what kind of movie magic you hath wrought.
You should also make sure that you preview your movie on the same type of equipment that your audience will use. This includes testing it in the player software that your audience will use if you plan to share your movie on the Internet or a recordable CD.

Freezing Frames from Video

The first part of this chapter shows you how to use still pictures in your movies. But there will also be times when you might want to freeze a video image for posterity, so to speak. You may want to grab still pictures from video to help promote your movie, or you may want a still image of someone or something, and the video clip is the only image you have. Just keep in mind that the resolution of video images is really, really low compared to even the cheapest digital cameras, so frame grabs from video will have a lower quality. The lower quality will be especially apparent if you print the frame grab because image details will look blocky and pixelated. To freeze a frame of video and turn it into a still picture:
  1. Open the video clip that has the frame that you want to freeze. If you don’t have a video clip of your own, you can use the sample video clip on the companion CD-ROM. In Pinnacle Studio, you must place the clip in the timeline before you can freeze a frame. To add a video clip to the timeline, simply drag it from the album to the timeline.
  2. Move the play head to the frame that you want to freeze.
  3. Grab the frame. In Apple iMovie, choose File➪Save Frame As. A Save As dialog box appears. In Pinnacle Studio, choose Toolbox➪Grab Video Frame. The Grab Video Frame toolbox appears. Choose the Movie radio button next to Grab From, click the Grab button, and then click Save to Disk.
  4. Save the frame. In iMovie, name the picture and choose a format in the Format menu. The available formats are JPEG and PICT, but if you’re not sure which format to choose, I recommend JPEG.
In Studio, name the file and choose a format from the Save As Type menu. Several formats are available, but I recommend the JPEG format for the greatest versatility.
After you have grabbed a frame of video, you can use the image on a Web page to promote your movie, use it as a background image for a DVD menu, or share it as you would any other still photo.

Making an overlay graphic

Pinnacle Studio treats still graphics as if they were titles. As explained, you can put titles in either the video track or the title track of the timeline. If you put a title in the video track, it will be a full-screen title. If you put the title in the title track, it will be an overlay title, which means the words will appear over a video image.
Because Studio treats still photos like titles, you can use the title track to overlay your own custom graphics over a video image. To try it, follow these steps:
  1. Open Microsoft Paint by choosing Start➪All Programs➪Accessories➪Paint.
  2. In Paint, choose Image➪Attributes. The Attributes dialog box opens.
  3. Enter the height and width of the video image used in your video project, and then click OK. If you’re working with a DV-format project, make the image 720 pixels wide and 534 pixels high if you are working with NTSC footage, or 768 pixels wide and 576 pixels high if you are working with PAL footage.
  4. Draw an object. Any old object will do, so let your creative juices flow.
  5. When you are done drawing, choose a color from the color palette that was not used in your drawing (or whatever object you actually drew in Step 4).
  6. lick the Fill tool
  7. Click a blank area of the image to fill it with the new color.
  8. Save your picture and then close Paint.
  9. Open Pinnacle Studio and the project in which you want to use the overlay graphic.
  10. Click the Show Photos and Frame Grabs tab on the left side of the album.
  11. If your drawing doesn’t appear in the album, click the folder button at the top of the album and browse to the folder in which you saved your Paint graphic. By default, Paint saves files in the My Pictures folder.
  12. Drag the overlay graphic from the album and drop it on the title track of the timeline. The overlay image should now appear over the image in the video track, You’re probably wondering how Studio knows how to make the background of an overlay graphic transparent.
When you place a graphic in the title track, Studio looks at the color of the pixel in the upper-left corner of the image and removes that color from the entire image. For example, if the upper-left pixel is black, all black pixels become transparent, whereas pixels that are blue, red, yellow, or other colors will remain. You may need to experiment with some different background colors for the best results. I have found that black works best most of the time.

Saturday, October 31, 2009

Placing images in the timeline of Pinnacle Studio

Studio is pretty conventional in the way it handles still graphics, which is a good thing. You can import pictures into the program and drop them in the timeline, just like almost every other video program available. Studio also makes it easy to use graphic images on top of video.
Studio’s media album has a special section just for still graphics. You can open it by clicking the Show Photos and Frame Grabs tab. By default, the album shows images in your My Pictures folder, but you can browse to a different folder if you wish by clicking the small folder icon.
To use a picture in your movie, simply drag it from the album and drop it on the video track of the timeline. The default duration for a still graphic is four seconds. To change the duration, select the clip in the timeline and click the Open Video Toolbox button. The video toolbox window appears above the timeline. Type a new time into the Duration field at the top of the toolbox window. Alternatively, you can just click-and-drag on the edge of the still clip in the timeline to adjust its duration.

Using images in your movie project

iMovie can use any picture that has been imported into iPhoto. In fact, importing the image into iPhoto first is mandatory — so if you haven’t imported your still graphics into iPhoto (as described in the previous section), do so now. When that’s done, you can start using still images in iMovie:
  1. Open iMovie and the movie project in which you want to use a still image.
  2. Click the Photos button. A collection of pictures that looks eerily similar to your iPhoto library will appear in the iMovie window.If you’ve gone to the trouble of organizing photos into different albums in iPhoto, you can switch between those albums using the menu above the image browser.
  3. Click the clip that you want to use in the movie to select it.
  4. Adjust the duration of the clip using the duration slider, which bears the images of a little tortoise and hare. The default duration for a still clip is five seconds, but if you want it to display for less time, move the slider towards the bunny, er, I mean hare. If you want the clip to appear slow and steady, move the slider towards the tortoise. At about this time, you’ll probably notice that your still graphic is moving in that little preview window in the upper-right corner of the screen. You’ll also notice the words “Ken Burns Effect” just above. No, the Ken Burns Effect doesn’t make Ken’s smiling mug appear in your movie. It makes the camera appear to slowly zoom in or out on the still image, providing a visual continuity of movement that is otherwise broken by using a still image amongst moving video clips. (Ken Burns, the well-known documentary filmmaker responsible for such films as The Civil War, uses this trademark effect in a lot of his films.)
  5. Click the Start radio button near the top of the screen. This allows you to adjust the zoom level at the beginning of the clip.
  6. Adjust the zoom slider. If you don’t want to zoom in on the image at all, drag the slider all the way to the left so that the zoom factor says 1.00.
  7. Click the Finish radio button near the top of the screen. This allows you to adjust the zoom level at the end of the clip.
  8. Adjust the zoom slider again. If you don’t want to use a “Ken Burns” zooming effect, make sure that the zoom factor at the Start and Finish of the clip are the same.
  9. Click Preview to preview the results of the effect. If you aren’t happy with the effect, continue tweaking the zoom settings and previewing the results.
  10. When you’re done making adjustments, drag the clip and drop it down on the timeline or storyboard to insert it in your movie.
You can still adjust clips after they have been dropped into the timeline or storyboard. Select the clip, click the Photos button, and then adjust the duration or other attributes in the Photos panel. Click Apply when you’re done making changes.

Organizing photos with iPhoto


In the interest of simplification, iMovie uses Apple iPhoto for organizing still photos. This makes a lot of sense if you think about it; these two programs work together pretty seamlessly. If you already use iPhoto to organize your still images, you can move on to the next section. But if you haven’t used iPhoto yet, you’ll need to before you can use stills in iMovie. I recommend that you have iPhoto version 2 (or later) installed on your computer. iPhoto comes preinstalled on any Mac that ships with OS X. If you don’t have the latest version, visit www.apple.com/iphoto/ to download this free program. Follow the instructions on the Apple Web site to download and install iPhoto. For more on using iPhoto, check out iPhoto 2 For Dummies by Curt Simmons, published by Wiley Publishing, Inc. When the program is installed, you can begin organizing your stills:
  1. Launch iPhoto by clicking its icon on the OS X Dock. Alternatively, you can open it from the Applications folder on your hard disk.
  2. Choose File➪Import. The Import Photos dialog box appears,
  3. Browse to the folder that contains the picture or pictures that you want to import.
  4. Select the picture and click Import. To select multiple pictures, hold down the Ô key while clicking each picture file you want to import.The picture appears in the iPhoto library. After the picture is imported into iPhoto, it’s ready for use in iMovie as well.
  5. You can now quit iPhoto if you want by pressing Ô+Q.

Getting the colors just right


I described how TV screens and computer monitors don’t show colors exactly the same way. The biggest problem is that some colors in computer graphics simply cannot appear on a TV. These colors are often called illegal or out-of-gamut colors. Although this isn’t a super-serious problem, you should still fix any out of gamut colors in your images before using them in video programs.
Unfortunately, the ability to easily fix out of gamut colors is usually only found in more advanced, expensive video-editing programs. Adobe Photoshop, which retails for about $600, is one such program. To fix the colors in an image, simply open the picture in Photoshop and choose Filter➪ Video➪NTSC Colors. This filter removes all colors from the image that are out of gamut for NTSC TVs. A lower-cost option that also enables you to fix out-of-gamut colors is Photoshop Elements, which is available for a much more affordable price of about $100. You might even be able to get it for free with some digital cameras.
If your image-editing program doesn’t have a video color filter, I wouldn’t lose too much sleep over it. But if it does, fix those out-of-gamut colors so that the image looks better in the final video program.

Monday, August 31, 2009

How to Adjust Image Size?


Again, you only need to convert the still image sizes if you plan to export the movie back to tape or DVD. If your movie will only be watched over the Web, you don’t need to convert the image. The exact steps you should use to adjust the image size vary depending on the image-editing program you are using, but in most programs, they work something like this:
  1. Open the picture in your picture-editing program.
  2. Open the dialog box that controls the image size in your software. In Adobe Photoshop, choose Image➪Image Size.
  3. Remove the check mark next to the Constrain Proportions option. Most editing programs have a similar constraining option (such as Constrain Size). Make sure it’s disabled.
  4. Change the image size to 720x534 if you’re working with NTSC video, or 768x576 if you’re working with PAL video.
  5. Click OK and save the image as a JPEG image file.
Save the image using the JPEG format because it can then be used in just about any video-editing program. If your picture-editing software gives you a quality option when you save an image as a JPEG, choose the highest quality possible if the image will be used in a movie program. Other versatile formats include BMP, PICT, and TIFF, but you should check the help system for your video-editing program to see which formats are supported.
Although the image may look slightly distorted after you change the size, don’t worry: It will look right when viewed with the rest of your video. Just remember that you only have to perform this modification if you plan to export the movie back to tape. If you plan to use your movie only on computer screens (or share it over the Internet), you don’t need to change the aspect ratio of the image.

Adjusting the image size


Most video images have an aspect ratio of 4:3, which means the width and height of the image can be divided into a 4:3 ratio. Most of the sample clips on the CD-ROM that accompanies this book have an image size of 320 pixels wide by 240 pixels high. If you do the math, you’ll see that 320x240 works out to a ratio of 4:3.
When you take a picture using a digital still camera, that picture usually has an aspect ratio of 4:3 as well. Image sizes that have a 4:3 aspect ratio include 640x480, 800x600, and 1024x768. Your computer’s monitor also probably has a 4:3 aspect ratio unless you have a newer widescreen monitor. Most TVs still have a 4:3 aspect ratio as well. Because the 4:3 aspect ratio is so common, dropping an 800x600 digital photo into a DV-based video project should be easy, right?
Unfortunately, it’s not always that easy.
Digital images are made up of pixels, which are tiny little blocks of color that, when arranged in a grid, make up a picture. Pixels can have different aspect ratios too. Digital graphics usually have square pixels, while video usually has rectangular pixels. The frame size of NTSC video is usually listed as 720x480 pixels. This does not work out to 4:3; it’s actually 3:2. However, it still appears to have a 4:3 aspect ratio because NTSC video pixels are slightly taller than they are wide.
What does all this mean? Suppose you place an uncorrected digital picture into a video program, and then you export that program back to tape. When you view the movie on a TV, the still image will appear distorted. To correct this, you need to start with a digital photo that has an aspect ratio of 4:3, and then (depending on your local broadcast video standard) change the image size to
  • 720x534 pixels (NTSC)
  • 768x576 pixels (PAL)
Use the size that matches your local broadcast video standard (see Chapter 3 for more on video standards). Before you convert an image to one of these sizes, it should have an aspect ratio of 4:3. Common 4:3 image sizes include 800x600, 1024x768, and 1600x1200.

Using Still Graphics in Movies


Although movies are all about motion, there are plenty of times you’ll want to include still graphics in your video projects. The process of importing stills into your video-editing program is usually pretty simple, but before you start plopping stills into your timeline, you should take some important steps to make sure that your images will look right. If you don’t take the time to prepare your stills, two main problems can result:
  • Images may become distorted and look unnaturally stretched or squeezed.
  • Colors might not display properly

Thursday, July 30, 2009

More ABout Stepping Up to More Advanced Editing


Most high-end editors simplify the capture process with a feature called log and capture. The log and capture feature allows you to create a log of clips that you want to capture. As you review the videotape and identify portions that you want to capture — a task you would undertake with any video-editing program — you simply log the timecode at the in point (beginning) and out point (end) of each piece of video you want to capture. In Adobe Premiere, you do this by clicking Set In at the beginning of the section, and then clicking Set Out at the end of the section. You can even type the timecode in the Set In and Set Out fields manually if you wish. When you’ve specified an in point and an out point, click the Log In/Out button. This adds the current in and out points to a log. The Batch Capture window serves as Adobe Premiere’s log. You can log as many sections from a tape as you want in a single log. I have logged five separate sections of video. After you have logged all of the portions of video that you want to capture from a given tape, capturing the video takes just a single mouse click. In Premiere, click the Record button at the bottom of the Batch Capture window. The software automatically rewinds and cues the tape in the camcorder as needed and captures all the sections of video that you specified. The capture process may take a while, but because it all happens automatically, you can take a lunch break while it occurs. If you capture a lot of video the old fashioned way in Apple iMovie or Pinnacle Studio, you’ll start to see why log and capture can be a big timesaver. Log and capture is just one example of the effort-saving features that advanced video-editing programs can offer. All the editing programs listed here look and work very similarly because they were designed to imitate the professional video-editing workstations used for years by broadcast pros. One of the things I really like about programs like Premiere or Final Cut Pro is the flexibility of their timelines. You normally have an almost infinite number of tracks to work with — very helpful when you want to overlay video images on top of each other. It may look like a very complex project, but I was able to assemble it quickly. The timeline currently has three video tracks and three audio tracks, but I can add more as I need them. Special effects are also a lot easier to work with in advanced editing programs. For example, suppose I want to make a video clip appear in its own little box (like a picture-in-picture display found on some TVs) and move the box across the screen. In Premiere, opening a Motion Settings dialog box for the clip is a simple matter,. Using simple point-andclick techniques with the mouse, I can draw a motion pattern for the clip and adjust zoom settings to make the clip bigger or smaller. Advanced video editors can also be powerful business productivity tools.
Corporate communications directors are finding that modern computers and
software make in-house video production more feasible (in the past it was usually
farmed out to a contractor). Businesses can use video editors to make
  • Training and orientation videos
  • Kiosk videos
  • Marketing materials
  • Presentation videos
One advantage of using video software for presentations is that once a presentation is exported to tape or DVD, you can show it almost anywhere. All you need is a TV and a VCR or DVD player. Although you lose some of the interactivity of, say, a PowerPoint presentation, you can still make a very professional-looking video using media of almost any type. Last year, for example, I used Adobe Premiere to develop a kiosk video to demonstrate some software. Using animation tools, I could simulate the movement of a mouse pointer on the screen. I can’t possibly show you all the advantages that advanced video-editing programs can offer, but this chapter shows some possibilities. Programs like Final Cut Pro, Edition, and Premiere are so advanced that the movie magic you can create is limited only by your imagination.

Stepping Up to More Advanced Editing


If it hasn’t happened to you yet, rest assured that it will: You want to do a certain kind of edit, but the software you’re using right now just won’t let you. Or you may find that some tasks are difficult or tedious to perform.
Before you get mad and break a keyboard or something, consider upgrading
to a more advanced editing program. Some well-regarded advanced editing
programs include
  • Adobe Premiere (Mac/Windows): Adobe kicked the affordable video editing revolution into high gear a few years ago with Premiere. It remains a popular choice among video professionals and hobbyists, although it has slipped in popularity in recent years as Final Cut Pro and others offer viable alternatives. Adobe Premiere retails for $549, although if you shop around, you may get a better deal by buying Premiere packaged with a high-quality video-capture card.
  • Avid Xpress (Mac/Windows): Avid has been making broadcast videoediting
  • software and equipment for years, and many professionals prefer the Avid Xpress video-editing software. And after years of spending tens (if not hundreds) of thousands of dollars for Avid editing workstations in the past, pros don’t mind the $1699 retail price of Avid Xpress. For the typical amateur moviemaker, however, some of the more affordable solutions make more sense.
  • Apple Final Cut Pro (Mac): Quickly becoming one of the most popular editing programs among pros and dedicated hobbyists, this program, which retails for $999, can do it all.
  • Apple Final Cut Express (Mac): If Final Cut Pro’s price tag is out of your reach, consider the $299 Express version. Unless you’re editing video professionally for broadcast TV or Hollywood movie studios, this is a better, much more affordable choice.
  • Pinnacle Edition (Windows): Pinnacle definitely knows video. Whether you’re a broadcast professional or DV newbie, Pinnacle has software and hardware worth considering. Edition is Pinnacle’s answer to Adobe Premiere and other high-end video editors. Pinnacle Edition DV retails for $699 with a FireWire card included, although if you already own Pinnacle Studio, you can upgrade to Edition for a lot less (at this writing, Pinnacle advertised an upgrade special of just $199).
  • Sonic Foundry Vegas (Windows): Vegas from Sonic Foundry has been quietly building a strong reputation among video editors, many of whom prefer Vegas to Adobe Premiere for Windows-based editing. The Vegas software retails for $699, though Sonic Foundry occasionally has special offers.
Although you may expect advanced editing programs to be more complex, I actually find them easier to use. For example, consider the process of capturing video from your camcorder. In Apple iMovie and Pinnacle Studio, you have to be quick with your mouse and buttons to start and stop capture. If you want to capture a lot of different scenes from a tape, this process can grow tedious because you have to sit there in front of your computer manually starting and stopping capture for each piece of video. And because you probably won’t actually capture a piece of video until you’ve reviewed it at least once, you’ll spend a lot of time rewinding the same video over and over.

Monday, June 29, 2009

Using Video Effects in Studio


Pinnacle Studio doesn’t have built-in special effects, per se, but it does offer tools to let you modify the appearance of your video clips. Here’s a summary of the tools and effects available in Studio:
  • Adjust color and lighting: You can modify colors and lighting in video clips using controls in the Adjust Colors toolbox. To open this toolbox, select a clip in the timeline and choose Toolbox➪Adjust Color. The toolbox appears above the timeline, as shown in Figure. Most of the time you won’t want to make any extreme adjustments, but you can correct color problems in video images with a little fine-tuning. If you’re going for a black-and-white look in your movie, you don’t need any special effects. Simply adjust the Saturation slider all the way to zero to remove color from the video image.
  • Blur: As you might guess, the Blur slider blurs the video image. If you set the Blur slider to number one, it does a fair imitation of a soft filter. Any higher setting, though, and the image just looks, well, blurry.
  • Emboss, Mosaic, and Posterize: These controls are of limited use, in my opinion, although they can be useful when you’re creating a custom background image (for a DVD menu, for example):
  1. Emboss gives the appearance that your video image has been embossed into plastic or metal.
  2. Mosiac changes the image into a pattern of colored square blocks. As you adjust the slider farther to the right, the blocks become larger, further distorting the image.
  3. Posterize reduces the number of colors in the image to create a cartoon-like appearance.
  • Vary playback speed: Studio has a really nice toolbox for adjusting the playback speed of video clips. To open this toolbox, choose Toolbox➪ Vary Playback Speed.
  • Overlay graphics: You can use the title editor to lay simple graphics over a video image_ Hollywood FX Pro: Pinnacle offers Hollywood FX Pro, a tool that can create some advanced video effects. Hollywood FX Pro is available as a plug-in for Studio for $99.

Controlling effects with keyframes


When you apply an effect to a clip, you may want the effect to appear only for part of the clip, or you may want the effect to change as the clip plays. In iMovie, you can make an effect appear or disappear gradually. More advanced video-editing programs like Adobe Premiere and Apple Final Cut Pro control effects by using keyframes. A keyframe is simply a frame of the movie that you set as a landmark (as you would the points you create and adjust on audio rubberbands when you edit audio). In advanced video-editing programs, you can set as many keyframes as you like, and you can change the properties of effects at each keyframe.
For example, suppose you use a rain effect on a video clip, and you want the rain to increase and decrease in intensity throughout the clip. Several seconds into the clip, you can set the rain to be very heavy. A few seconds later, create another keyframe where the rain is very light. The software automatically adjusts the Rain between those keyframes to make the change appear gradual.
Using keyframes effectively take a while to learn, and if you use a program like Adobe Premiere, I recommend you get a book that more fully describes the features of that programBut the keyframe feature does give you almost infinite control over the effects in your movies, so it’s definitely worth seeking out if you plan to move up to a more advanced editing program.

Customizing effects in Video Editing


Most effects can be customized to some extent. When you click an effect, controls relating to that effect should appear in the Effects pane, as shown in Figure. The exact controls that will be available vary depending on the effect, so some experimentation may be necessary. In Figure, I am adjusting the Virtix Flame effect, which is available as a free iMovie plug-in from Virtix (www.virtix.com). Slider controls at the bottom of the Effects pane let me control the height and appearance of the flames. Some other controls on the Effects pane are common to all effects. These include
  • Effect In: This slider lets you control when the effect begins. If you adjust this slider to create a delay, the effect appears gradually as the clip plays. If you want the effect to apply to the whole clip, leave this slider set to 00:00.
  • Effect Out: Like the Effect In control, this slider lets you end the effect before the clip ends.
  • Preview: If the tiny little preview screen in the Effects pane isn’t big enough to see the effect, click the Preview button. A short preview of the effect appears in the main iMovie viewer window, as shown in Figure.
  • Apply: Click this to apply the effect to the currently selected clip in the timeline.
After you apply an effect to a video clip, iMovie must render the effect. A thin progress bar will appear on the clip in the timeline. Rendering is a process where iMovie applies your effect to the clip and creates a new video file on your hard disk that incorporates the change. If you decide later that you want to remove an effect from a clip, select that clip in the timeline, and then use the effect controls in the Effects pane to reduce the amount of the effect in the scene. You can’t remove the effect completely, but most effects can be

Sunday, May 31, 2009

Reviewing iMovie’s effects


For a free program, Apple’s iMovie sure comes with a lot of great features, including some special effects that can quickly transform the look and feel of your video clips. Besides the effects that come with iMovie, you can add effects by installing plug-ins from Apple and third-party software vendors. To view a list of iMovie’s effects, click the Effects button. The Effects pane appears. To preview an effect, just click it in the list of effects. A small preview of the effect appears at the top of the Effects pane, using whatever video is located at the current position of the play head in the timeline.
  • Earthquake: As the name implies, this effect shakes the video image as if an earthquake were happening. Use a short earthquake effect combined with the sound of a large thud when someone falls down in your video.
  • Electricity: This one has a shocking effect on your video by creating a continuous lightning bolt in your video. Use this effect in conjunction with the Electricity sound effect in the Audio pane
  • Fairy Dust: This effect looks more like a burning fuse to me, but the folks at Apple call it “Fairy Dust,” so who am I to argue?
  • Flash: The Flash effect makes the video image flash periodically. Combine the Flash effect with the Earthquake effect to create a more disorienting scene, or combine it with the Aged Film effect to make your video look really old and deteriorated.
  • Fog: Add some mystery to your scene with the Fog effect. This effect is a classic example of an image that is often easier to edit into your video via software than to actually photograph. Use the Fog and Black & White effects together for a film noir look.
  • Ghost Trails: Slight ghost trails are added to moving objects in the video image. Here’s another effect that can be used to make a scene look disorienting.
  • Lens Flare: Lens flares are bright spots or streaks that occur when the sun or another bright light source reflects on the camera lens. You need to avoid lens flares when shooting video, but sometimes you may want to add a lens flare to make a mostly-imaginary scene look “photographed.” Professional moviemakers often add “fake” lens flares to animated or computer-generated images to make the scene look more realistic.
  • Letterbox: Simulate that Hollywood movie “widescreen” look with this effect, which puts a black bar across the top and bottom of the video image. Just keep in mind that the top and bottom of your video image will be cut off.
  • Mirror: iMovie actually offers two Mirror effects that turn half your video picture into a mirror image of the other half. One Mirror effect reflects only horizontally; the other can reflect both horizontally and vertically.
  • N-Square: Ever wonder how a housefly would see your video? The N-Square effect may show just that. This effect divides the screen into squares and copies the video clip to each square. You can adjust the number of squares from four up to 64 as shown in Figure.
  • Rain: Add some fake weather to your scene with this effect. The fake rain drops added to a video clip by this effect show up much better onscreen than real rain, yet the scene still looks realistic. Use this effect in conjunction with the Rain sound effect in the Audio pane.
  • Soft Focus: Simulate a soft filter on the camera with this effect. The Soft Focus effect works well in dream sequences, or to cover up blemishes on a video subject.

Using Video Effects in iMovie

When I mention “special effects,” what’s the first thing that pops into your mind? You’re probably envisioning spaceships soaring between the stars, giant monsters destroying a city, or a superhero soaring unassisted through the sky. Such effects are indeed special, but they only scratch the surface of how effects can be used in movies. Special effects can
  • Transport the viewer to a different place and time.
  • Show subjects that would be otherwise impossible or too expensive to photograph.
  • Change the mood or feel of a piece of video.
  • Add visual excitement or a sense of the exotic. Special effects aren’t all about spaceships and monsters. Consider the scene in Figure. I have used a Mirror effect in iMovie to create a kaleidoscopic image. This effect would look right at home in a music-video-style project.

Generating background music with SmartSound

Pinnacle Studio comes with a tool called SmartSound, which can automatically generate music in a variety of styles to match your project. To generate some music from SmartSound, open a project in Studio and choose Toolbox➪ Generate Background Music. The audio toolbox appears. SmartSound offers music in a variety of styles. Each style includes several songs; most have a few different styles available. Click the Preview button to preview a style, song, and version. When generating background music, figure out approximately how long you want the musical piece to play. For example, when the three sample clips are placed in the timeline, their total length is a little more than 21 seconds. Adjust the duration of the music by typing a new time in the Duration box (in the upper-right corner of the audio toolbox). When you click Add to Movie, SmartSound automatically generates a piece of music in the chosen style, song, and version, and it plays for approximately the duration you chose. You can also name the selection if you want, using the Name field at the top of the toolbox.
One advantage of SmartSound’s automatically generated music is that you can use it without paying royalties every time someone views your movie. Even so, remember that SmartSound does have some licensing restrictions. They’re worth reviewing before you use them in a movie you plan to show to the public. For SmartSound license details, click the SmartSound button in the Studio audio toolbox.

Wednesday, April 29, 2009

Adding music from a CD

I’ve shown you how to import music from audio CDs or MP3 files. After you have inserted an audio file into your editing program, you can add the file to the music track in your timeline. The procedure varies depending on which editing program you are using:
  • In Apple iMovie, use iTunes to import music from audio CDs into your iTunes library. Then click the Audio button in iMovie, choose iTunes from the menu at the top of the audio pane as shown in Figure, and click-and-drag a song from your iTunes library to an audio track on the iMovie timeline.
  • In Pinnacle Studio, place a music CD in your CD-ROM drive and choose Toolbox➪Add CD Music. The Add CD Music toolbox appears. Choose the audio track that you want to use in the Track menu, and then click Add to Movie. Close the Add CD Music toolbox, and then click Play under the preview window to play your timeline. The first time you play the timeline, Studio will import the music from the CD. After the music is imported, you can remove the CD from your CD-ROM drive.

Using sound effects in Pinnacle Studio

Pinnacle Studio comes with a diverse collection of sound effects. To view a list of them, click the Show Sound Effects tab on the left side of the album or choose Album ➪ Sound Effects. When you view the Sound Effects tab of the album, you may not actually see a list of effects, particularly if you’ve used this tab to import MP3 audio or other sounds not directly connected with Pinnacle Studio. If sound effects aren’t shown, you’ll have to click the folder icon at the top of the album and browse to the following folder on your hard drive:

C:\Program Files\Pinnacle\Studio 8\Sound Effects

In that folder, you will see a selection of 13 subfolders, each of which contains a category of sound effects. For example, if you want to find chirping birds, double-click the Animals folder and then click Open. A list of animal sound effects will appear in the album (as shown in Figure). To preview a sound effect, simply click it in the album. To use it in your movie project, click-and-drag it to the sound effects/narration track in the timeline.

Using sound effects in Apple iMovie

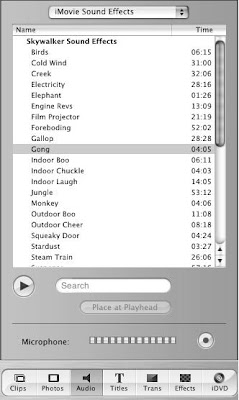
To view a list of sound effects in iMovie, click the Audio button above themtimeline and choose iMovie Sound Effects from the menu at the top of thenaudio pane. A list of soundneffects appears (as shown in Figure), includingbstandard sound effects as well as special Skywalker Sound Effects that were new with iMovie 3. Skywalker Sound, as you may know, is the brainchild of George Lucas of Star Wars fame, and the sound effects included with iMovie are very high-quality. To preview a sound effect, choose it from the list and click Play in the audio
pane. To use a sound effect in your project, simply click-and-drag it to an audio track in the timeline. You can trim and adjust the volume of sound effects just as you would any other audio clip.

Tuesday, March 31, 2009

Working with sound effects


Sound effects can really separate a good movie from a great movie. I suggested that if a picture is worth a thousand words, sometimes a sound is worth a thousand pictures. Consider how various sound effects can affect the mood of a scene:
  • A quiet room somehow seems even quieter if you can hear the subtle ticking of a clock.
  • Applause, cheering, or laughter suggest how the viewer should feel about an event in the movie.
  • Chirping birds suggest peace and serenity.
  • Footsteps make movement seem more real, even when the feet are not shown in the video image.
Those are just a few examples, but you get the idea. You can create and record your own sound effects if you want. Fortunately, most video-editing programs now come with ready-to-use libraries of common sound effects to enhance your movie projects.

Adjusting volume dynamically

Believe it or not, I very seldom adjust the overall volume of an entire clip or track. Usually I prefer to adjust volume dynamically throughout the clip. Adjusting volume dynamically allows me to fine-tune audio to better match other things that are going on in the project. I adjust volume dynamically at times like these:
  • Narration is about to begin: I may reduce the volume of background music a bit so that the spoken words are more easily heard.
  • The sound changes between video clips: Such a change often sounds abrupt or harsh. I can reduce that by fading audio in at the beginning of the clip, and fading it out at the end. Studio has handy Fade In and Fade Out buttons, which automatically make fade adjustments to the audio rubberbands for a clip.
  • I can eliminate unwanted sounds from a clip: For example, the Scene 1 sample clip from the companion CD-ROM shows a motorcycle passing by the camera on a racetrack. But the beginning of the clip has the sound of another motorcycle that is actually behind the camera. I can eliminate the sound of that other off-camera motorcycle by dynamically adjusting volume as I’ve done in Figure.
Dynamic volume adjustment is where audio rubberbands really come in handy. Click once on a rubberband for one of your audio clips. When you click the rubberband, you’ll notice that a little dot appears. You can click-anddrag that dot up or down to adjust the volume of the clip. Not only can you place as many dots as you can squeeze onto a rubberband, you can also move those dots around on the rubberband to make constant adjustments throughout the clip. Like real rubberbands, audio rubberbands are stretchy and can be moved quite a bit, but unlike real rubberbands, they don’t snap back when you stop moving them. Play around a bit with the rubberbands to see just how fun volume adjustments can be!
Those little dots on audio rubberbands act like pins to hold the bands in place. If you want to get rid of a dot, click-and-drag it off the top or bottom of the clip. Twang! The dot will disappear and the rubberband will snap back into place.

Adjusting overall volume

Modifying the overall volume for an audio clip or a whole track is pretty simple, but the procedure varies a bit depending on which program you are using.
In Apple iMovie, follow these steps:
  1. Click a clip to select it. (To adjust multiple clips simultaneously, hold down the Ô key as you click each clip.) Be careful not to click the purple rubberband line. If you accidentally click the rubberband and a dot appears on the line, press Ô+Z to undo the change.
  2. With the desired clip(s) selected, adjust the Volume slider leftward to reduce volume or right to increase volume.
As you adjust the slider , you see the rubberband lines move up or down.
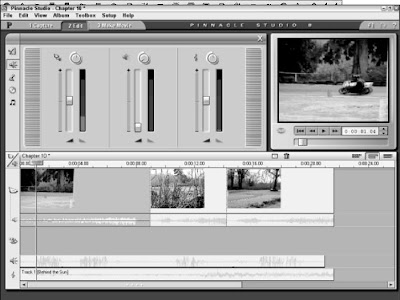
Pinnacle Studio provides a variety of volume controls in the audio toolbox, as you can see in Figure. To open this toolbox, click an audio clip in the timeline and choose Toolbox➪Change Volume. The toolbox contains a separate set of controls for each of the three audio tracks:
  • Left: Main audio track
  • Middle: Sound effects/narration track
  • Right: Background music track
To adjust the overall volume for an entire track, turn the knob at the top of the track’s volume controls. As you turn the knob, you see the blue audio rubberband line for the entire track move up or down in the timeline. If you want to adjust the volume for a specific clip, place the play head at the very beginning of that clip in the timeline and move the volume slider for that track up or down. Then place the play head at the end of the clip, and adjust the volume slider back to the middle to restore the volume of subsequent clips in the timeline.
You can also mute whole tracks in the timeline if you want. In iMovie, simply remove the check mark from the right side of the timeline next to the track you want to mute. In Studio, click the icon at the top of the volume controls in the audio toolbox to mute a given track.

Saturday, February 28, 2009

Adjusting volume


Perhaps the most common thing anyone does to audio tracks is adjust the volume. As you preview your project, you may notice that the background music seems a little too loud or the narration isn’t loud enough. You may also have sounds in the main audio track that you want to get rid of altogether, without affecting the rest of the audio clip. Virtually all video-editing programs allow you to adjust volume in two different ways:
  • You can adjust the overall volume of an entire clip or track.
  • You can adjust volume dynamically within a clip, making some parts of the same clip louder and some parts quieter.
If you don’t have audio clips of your own to work with. Place all three scenes in the timeline in sequential order.
To begin adjusting volume in iMovie, place a check mark in the Edit Volume check box at the bottom of the timeline. In Studio, click the clip you want to modify and then choose Toolbox>Change Volume so that Studio’s audio toolbox appears above the timeline.
Each program displays audio rubberbands across audio clips. Rubberbands aren’t just for holding together rolled up newspapers or your hairdo; in video programs, they show you the volume for an audio clip, and they allow you to make dynamic adjustments to the volume throughout the clip.

Adding audio to the timeline

Adding audio to the timeline is pretty easy. Record and import your and then simply drag-and-drop it to an audio track.
Video Sound effects Background music You can move clips by dragging them left or right in their respective tracks, and you can trim them by dragging on the edges. In fact, you’ll find that editing audio tracks is a lot like editing video tracks. Sometimes you’ll want to edit main audio independently of the video clip with which it is associated. In iMovie, first extract main audio from the video clip by selecting the clip and choosing Advanced>Extract Audio. In Studio, click the track header on the left side of the timeline to lock either the main video or main audio track. When the main video track is locked, you can edit the main audio track without affecting clips in the video track. One nice feature of iMovie is that it allows you to link audio clips to video clips. For example, suppose you’ve recorded some narration to go along with a video clip. If you decide to move that video clip to a different part of the timeline, you have to move the narration clip as well. If the two clips are linked, moving one will also move the other. To link an audio clip to a video clip in iMovie, follow these steps:

  1. Position the audio and video clips that you want to link in the timeline.
  2. Move the play head to the beginning of the audio clip.
  3. Click once on the audio clip to select it.
  4. Choose Advanced>Lock Audio Clip at Playhead.

A yellow pin appears on both the audio and video clips. If you move the video clip to a different place in the timeline, the linked audio clip moves with it. To unlink the clips, select the audio clip and choose Advanced>Unlock Audio Clip.

Understanding audio tracks

A movie program can play several sources of audio at once. For example, while you hear the audio that was recorded with a video clip, you may also hear a musical soundtrack and some narration that was recorded later. When you’re working on a movie project in your editing software, each of these unique bits of audio would go on its own separate audio track in the timeline. Most editing programs provide audio tracks for main audio (the audio that was recorded with a video clip), music, and narration. More advanced editing programs offer you many more audio tracks that you can use any way you see fit. Adobe Premiere, for example, can provide up to 99 separate audio tracks in the timeline. Although it’s difficult to imagine anyone actually needing that many audio tracks, having too many is better than not having enough. Pinnacle Studio provides three separate audio tracks. To lock a track in Studio, click the track header on the left side of the timeline.
Apple iMovie handles audio tracks a little differently, but you still have essentially three audio tracks to work with. The main audio track is actually hidden inside the video track. Two other audio tracks handle sound effects and background music. You can extract audio from video clips if you want (simply select the clip in the timeline and choose Advanced>Extract Audio), but doing so causes the main audio to take up one of the other two audio tracks. You can enable or disable audio tracks by using the check boxes on the right side of the timeline. This is helpful during editing when you want to hear just one or two audio tracks at a time.

Friday, January 30, 2009

Using Audio in a Project

Most movie-editing programs follow similar patterns. They all use storyboards and timelines for assembling the project, and most programs have similar windows for organizing and previewing clips. You’ll also find that most programs have a lot in common when it comes to editing audio. For example, even the most affordable editing programs usually have separate audio tracks in the timeline for background music, narration (or sound effects), and the audio that accompanies the video clips in the timeline. Many movie-editing programs can also show audio waveforms. A waveform is a line that graphically represents the rising and falling level of sound in an audio clip. In Figure above shows the waveform for some narration I recorded in Pinnacle Studio. Waveforms are useful because they allow you to edit your audio visually, often with pinpoint accuracy. By looking at the waveform, you can tell when loud sounds or extended periods of quiet occur. Although many movie-editing programs use audio waveforms, Apple iMovie isn’t one of them. You can still edit audio (as I show later in this chapter); you just won’t be able to do it visually in iMovie. Fortunately there are plenty of other programs that can display audio waveforms — including Apple Final Cut (both the Express and Pro versions), Adobe Premiere, Pinnacle Studio, and Windows Movie Maker.

Changing the Length of Titles

After you’ve added some titles to your movie project and previewed them a couple of times, you’ll probably find that you need to change how long some of them appear. Does the title flash by so quickly that you don’t have time to read it? Does the title seem to linger a few seconds too long? Changing the length for titles is pretty easy, but you must be viewing the timeline in your editing program, and not the storyboard. The timeline is where you perform “fine-tuning” edits such as changing the length of a title.
If you want to change the length of a title, you can do it in a couple of ways:
  • In almost any video-editing program, hold the mouse pointer over an edge of the title in the timeline, and then click-and-drag the edge back and forth to make the title longer or shorter. This method is quick and easy but not very precise.
  • In Pinnacle Studio, double-click the title to open the Title Editor. Change the time listed in the Duration field near the top of the Editor. You can either type a new number in the Duration field, or use the arrows next to the Duration field to increase or decrease the duration.
  • In iMovie, move the Speed slider left or right in the title designer window. In addition to altering the duration of your title, you can change which clip your overlay titles appear over. Just drag the titles left or right in the timeline if you want to change when they appear.

Creating Titles in iMovie

Apple prides itself — and rightfully so — on providing computers and software that are easy to use. Adding titles to your iMovie project could hardly be easier. To create a title, follow these steps:
  1. If you’re creating an overlay title, click the video clip in the timeline that will appear behind the title. This operation ensures that the proper clip appears in the preview window as you edit and preview your title. If you’re currently working in storyboard mode, I recommend that you switch over to the timeline by clicking the Timeline button, which appears to the lower-left of the monitor. If you’re creating a full-screen title (one that is over a black background instead of superimposed over a clip), don’t worry about selecting a clip in the timeline: Just go straight to Step 2.
  2. Click the Titles button above the timeline. The iMovie title designer appears.
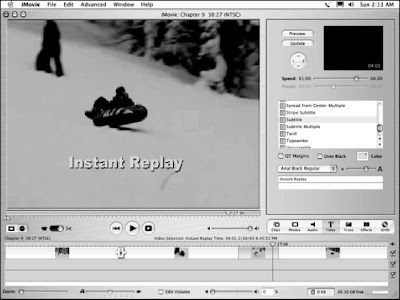
  3. Type the words for the title in the text boxes near the bottom of the title designer (as in Figure).
  4. Choose a title style for your title from the Titles list (not to be confused with the brand of golf ball). Most of the listed titles are for moving titles. When you click one, a preview of the motion appears in the preview window at the top of the title designer. If you want a static title that doesn’t move, choose a Centered, Stripe, or Subtitle title.
  5. If the movie will be output to videotape or DVD for viewing on conventional TVs, make sure the QT Margins option is not checked. The QT option allows titles in movies destined for the Web to use a little more screen space, but this isn’t recommended for movies that will be shown on TVs. The problem is overscan, which I described earlier in the section, “Making Effective Titles.”
  6. If you want to create a standalone title with a black background, place a check mark next to the Over Black option. 7. Click the Color box to choose a new color for the title.
  7. Use the Font menu to choose a new font face, and adjust the size of the title using the size slider.
  8. When you’re ready to add the title to the project, drag the title from the Titles list and drop it into the timeline, just before the clip over which you want the title to appear. The title will appear in the timeline. If you created an overlay title, it will be automatically superimposed on the video clip before which you placed the title. If you choose the Over Black option in Step 6, the title will be a standalone clip in the timeline with a black background.
If you decide to edit a title you created earlier, select the title in the timeline, make your changes, and then click the Update button at the top of the title designer window.

Wednesday, January 14, 2009

Changing backgrounds

If you’ve read this blog section from the beginning, you’ve already heard me preach about how white words over a black background are easier to read than any other style of title. But face it: Plain black backgrounds are a little, er, boring. If you want to spice up the appearance of your full-screen titles a bit, use the Title Editor to add a background. Here’s how:
  1. Double-click a full-screen title in your timeline to open it.
  2. Click the Backgrounds button to show the background controls.
  3. To change the color of a solid background, click the background color radio button, and then click the color box to choose a new color. You can also choose the gradient or transparent radio buttons if you want.
  4. To use a background image instead of a solid color or gradient, click the Background Picture radio button, and then click a picture in the list.
In Figure, I have chosen a winter-themed background for my full-screen title. If you have a picture you’d like to place in the background, click the Pictures button, and then click the Folder icon in the pictures list to browse to the picture file on your hard disk. You can then click-and-drag the picture onto the title and position it anywhere you’d like.

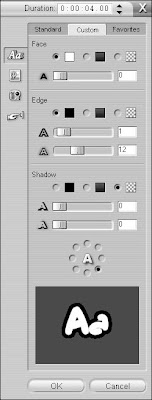
Three sections of the Custom tab control

To change the color of your text, click the Custom tab on the right side of the title editor screen. As you can see in Figure, this tab offers a variety of useful controls for text. The controls are divided into three sections: Face, Edge, and Shadow. Each section has a radio button for color, gradient, or transparent. If you want the element to be a solid color, choose the color radio button, and then click the color box next to it to open a color picker and choose a specific color. If you want the element to be a gradient (a color that gradually changes from one color at one side of the letter to a different color at the other side), click the gradient radio button and then click the gradient box next to it to specify the colors used in the gradient. If you want the element to be transparent, choose the transparent radio button.
The three sections of the Custom tab control separate elements of the title text:
  • Face: This section controls the basic face of the text. You can choose a solid color, make the color a gradient, or make the text face transparent. Only choose the transparent radio button if the text has a thick, visible edge. You can also blur the appearance of the face using the slider control at the bottom of the Face section.
  • Edge: Here you can change the color and size the edges of characters. Like the text face, edges can be a solid color, a gradient, or transparent. Choose the transparent option if you simply don’t want the text to have an edge at all. Adjust the upper slider in the Edge section to change the size of the edge. Move the slider right to make the edge thicker, or move it left to make the edge thinner. Remember, very thin lines will flicker when the movie is viewed on a TV screen, so try to make the edge at least three pixels thick. An indicator to the right of the size slider tells you the current thickness in pixels. To blur the appearance of the text’s edge, adjust the lower slider in the Edge section.
  • Shadow: Add — and color — a shadow for your text, and control the direction of the shadow using the round direction control. Shadows can help make text easier to read over some backgrounds. Like other text elements, shadows can be a solid color, a gradient, or transparent.
The upper slider in the Shadow section changes the apparent distance between the text and the shadow, and the lower slider blurs the shadow slightly. Generally speaking, the farther a shadow is beneath the text, the more you should blur the shadow. The radial control underneath the sliders lets you control the direction of the shadow. Click a radio button around the A to change the direction of the shadow. When you’re done editing your title, click OK in the lower-right corner of the Title Editor to close it and return to the Studio timeline. As you play with the Title Editor a bit, you’ll probably find that creating titles from scratch takes a while. That’s why I normally use one of the ready-made text styles (on the Standard tab of the Title Editor) as a starting point.

Editing titles

The Title Designer window is one of the most complex windows in the Studio software. If you are working with a predesigned title, double-click it in the timeline to change the text. The title will open in the title editor. To change the text, click once on the title and start typing. Highlight unwanted words and press the Delete key to delete them.
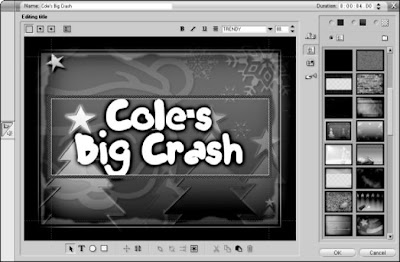
You can change the font style or size for the title if you don’t like it. Select the text you want to change, and then choose a new font in the font menu at the top of the Title Editor. In Figure, I have changed the font to Trendy because I didn’t like the Pretext font that was used in the “Snow Boarding” title. Figure also shows the basic controls of the Title Designer. Some of the most important controls include
  • Roll: Click this to make the title roll vertically up the screen. This is especially useful if you have a long list of credits that you want to roll at the end of the movie. If you choose the Roll option, the Title Editor allows you to scroll down the editing area to add more rows of titles. You can make a roll title as long as you want. Each time you add a new line of text to the bottom of a rolling title, the title screen gets a little longer.
  • Crawl: Click this to make the title crawl across the screen from right to left. Crawl useful text across the bottom of the screen, such as, “Order now! Quantities are limited!” Like rolling titles, you can make a crawling title wider by simply adding more text to the right side of the title.
  • Text styling: Select some text in your title, and then click one of these buttons to style the text. Just like in a word processor or almost any other computer program, click B to make the text bold, click I to make it italic, and click U to underline the text.
  • Text justification: Click this button to open a submenu of text justification and alignment options. You can choose to align text left, right, or centered. If you click the Shrink to Fit button, the text will automatically shrink to fit in the text box if you make the box smaller. If you click Scale to Fit, the text shrinks or grows to fill the entire text box if you make it smaller or bigger. If you want long lines of text to automatically wrap to the next line, click the Word Wrap On button. Otherwise, click the Word Wrap Off button. Click the Close (X) button in the upper right corner of the Text justification menu to close the menu.
  • Add Text Field: Click this button and then click-and-drag a text box in the editing area to create a new line of text from scratch.
  • Text styles: Use these predefined styles to quickly format text. To apply a style to some existing text, select the text in the editing area and then click a style in the list.
When you edit titles in Studio, make sure that the words stay inside the title safe boundaries, which are the red dotted lines around the edges of the title editor window. Text that falls outside of those boundaries may be cut off when the movie is viewed on a TV screen.